CodeScoring SCA Plugin for IntelliJ based IDEs
The plugin provides Software Composition Analysis (SCA) capabilities for IntelliJ IDEA and other IntelliJ Platform based IDEs, highlighting vulnerable dependencies in your project files and providing detailed vulnerability information through Johnny CLI integration.
The CodeScoring SCA plugin supports IntelliJ IDEA versions 2024.1 and above, as well as all IDEs based on IntelliJ Platform (OpenIDE, GIGA IDE, PyCharm, WebStorm, PhpStorm, RubyMine, GoLand, CLion, Rider, Android Studio).
Supported Ecosystems
Languages and Package Managers
| Ecosystem | Manifest Files | Lock Files | Features |
|---|---|---|---|
| Java/JVM | pom.xml, .gradle, .gradle.kts, ivy.xml | gradle.lockfile, gradle-dependency-tree.txt, maven-dependency-tree.txt | Full support for Maven and Gradle |
| JavaScript/Node | package.json | package-lock.json, yarn.lock, npm-shrinkwrap.json, pnpm-lock.yaml | NPM, Yarn, PNPM |
| Python | setup.py, pyproject.toml, pipfile | requirements.txt, requirements.pip, Pipfile.lock, poetry.lock | Pip, Poetry, Pipenv |
| Ruby | Gemfile, gems.rb, *.gemspec | Gemfile.lock, gems.locked | Bundler and RubyGems |
| Go | go.mod | go.sum | Go modules |
| Rust | Cargo.toml | Cargo.lock | Cargo |
| PHP | composer.json | composer.lock | Composer |
| C#/.NET | .csproj, packages.config, .nuspec, paket.dependencies | packages.lock.json, project.assets.json, paket.lock, project.lock.json | NuGet and Paket |
| Swift | Package.swift | Package.resolved | Swift Package Manager |
| Objective-C | Podfile, *.podspec | Podfile.lock | CocoaPods for iOS/macOS |
| C/C++ | conanfile.txt, conanfile.py | conan.lock | Conan package manager |
| Conda | environment.yml, meta.yml, environment.yaml, meta.yaml | conda-lock.yml | Conda environments |
Default File Detection
- Automatic: Scans all supported files
- Recursive: Searches in project subdirectories
Fine-tuning the scan is done by modifying the config.yaml file
Getting Started
Prerequisites
Before you begin, ensure you have:
- IntelliJ IDEA 2024.1 or newer (or any compatible supported IntelliJ based IDE)
- Access to a CodeScoring installation with active credentials
- The codescoring-intellij plugin distribution (.zip file)
Required Permissions
- File system: Read project files, write .codescoring files, download executable file, execute downloaded CLI
- Network: Communication with CodeScoring API
- VS Code API: Editor integration
Step 1: Download the Plugin
The plugin is provided as a codescoring-intellij-<version>.zip file.
Step 2: Install the Plugin from ZIP File
- Open IntelliJ based IDE
- Go to File → Settings (or \<IDE Name> → Preferences on macOS)
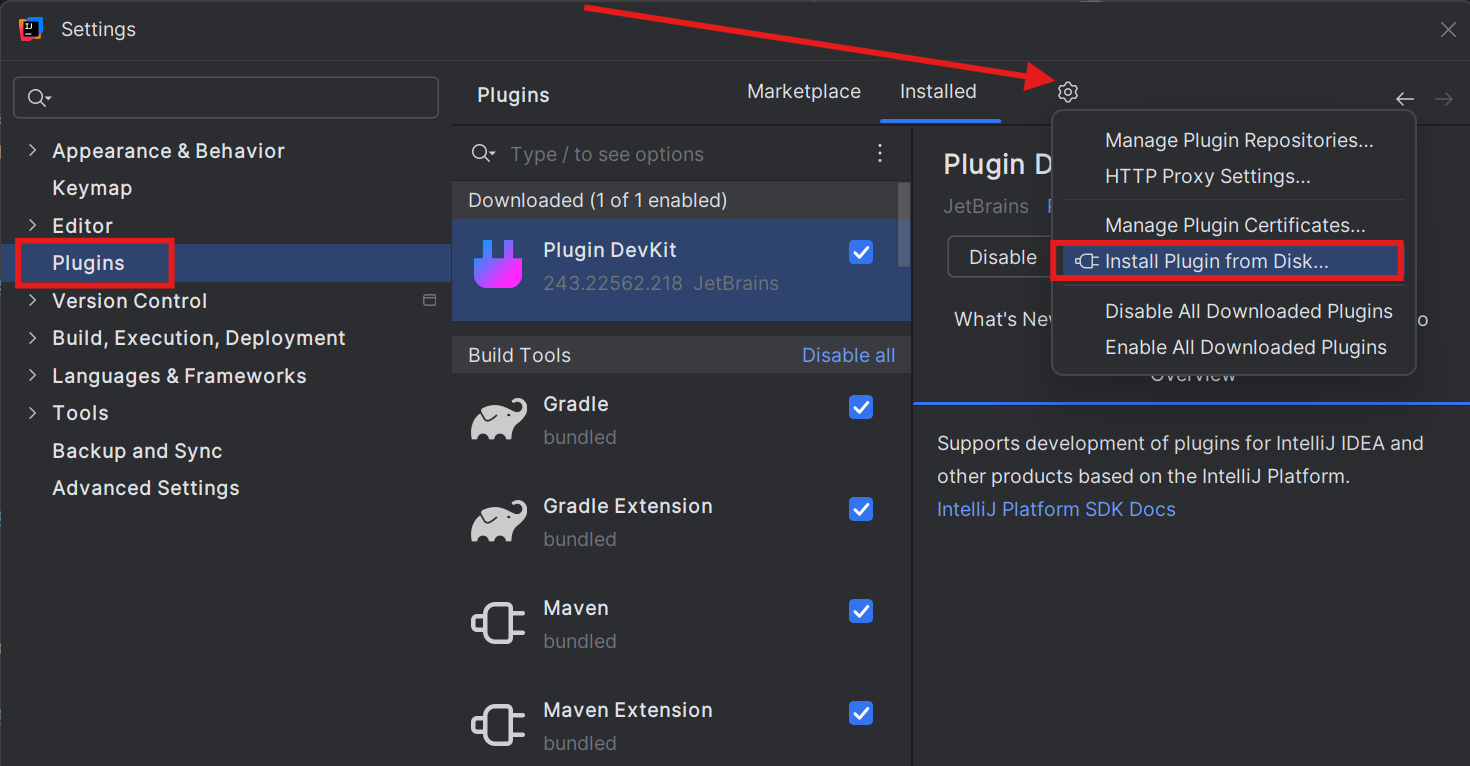
- In the settings dialog, select Plugins in the left sidebar
- Click the gear icon (⚙) at the top of the plugins panel
- Select "Install Plugin from Disk..." from the dropdown menu
- Navigate to where you downloaded the
.zipfile - Select the file and click "OK"
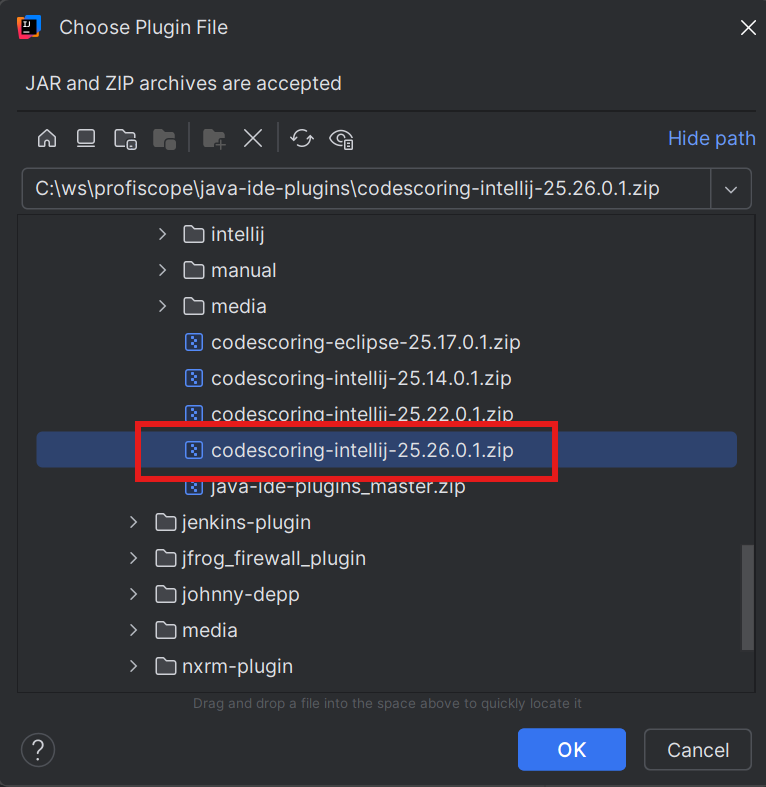
- Wait for the installation to complete
- Confirm the installation of the plugin from CodeScoring
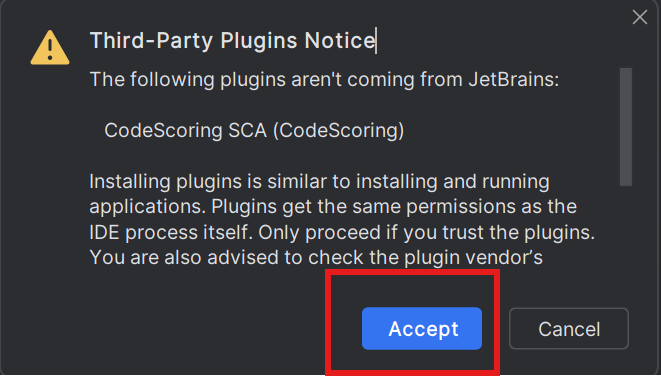
- Restart IntelliJ based IDE when prompted
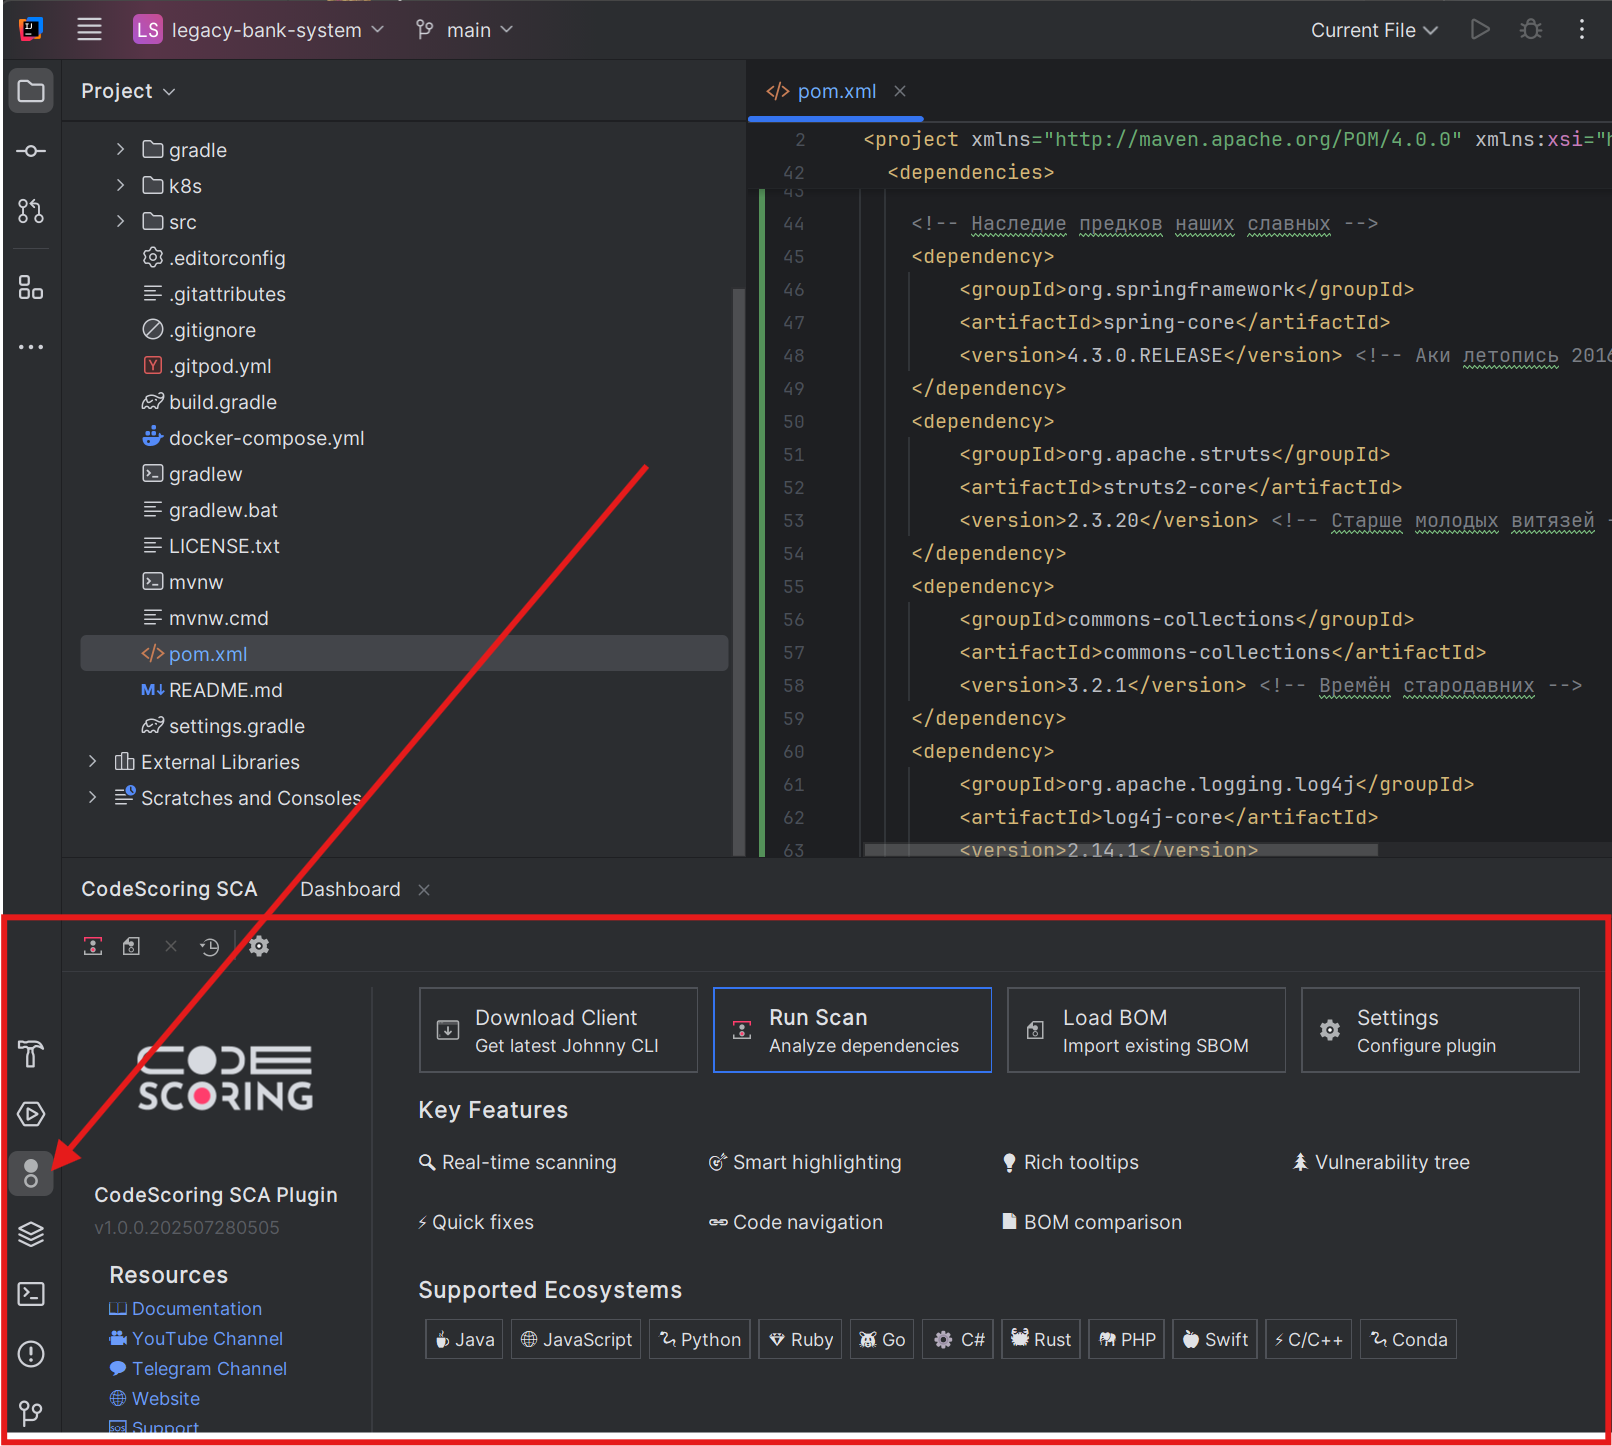
Step 3: Locate the CodeScoring Plugin
After installation and restart, you should see the CodeScoring tool window.
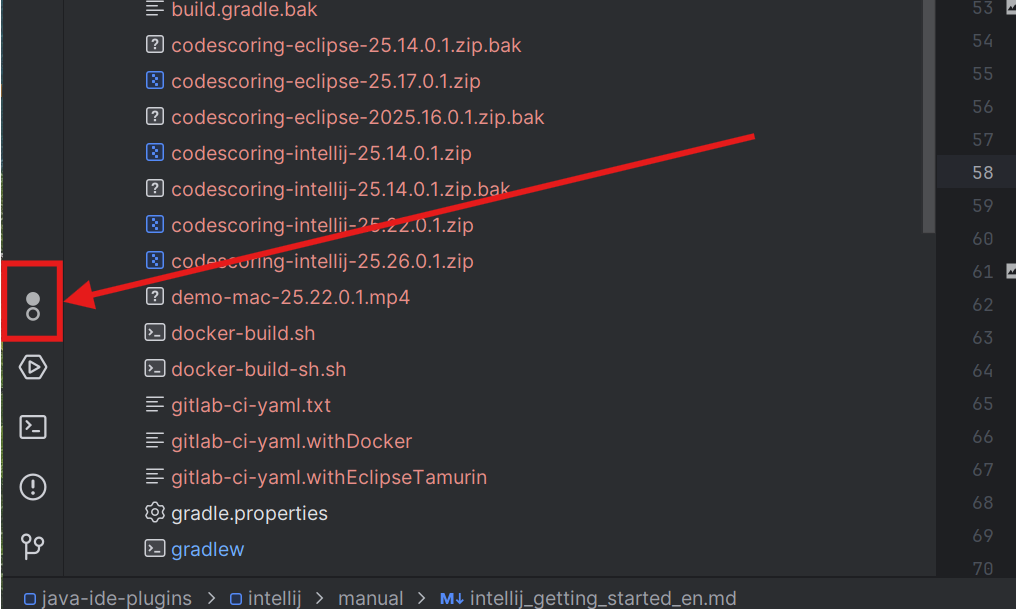
- Look for the "CodeScoring SCA" tool window tab (usually at the bottom or left of the IDE)
- If not visible, go to View → Tool Windows → CodeScoring SCA
- This will open the CodeScoring SCA tool window with the Dashboard panel
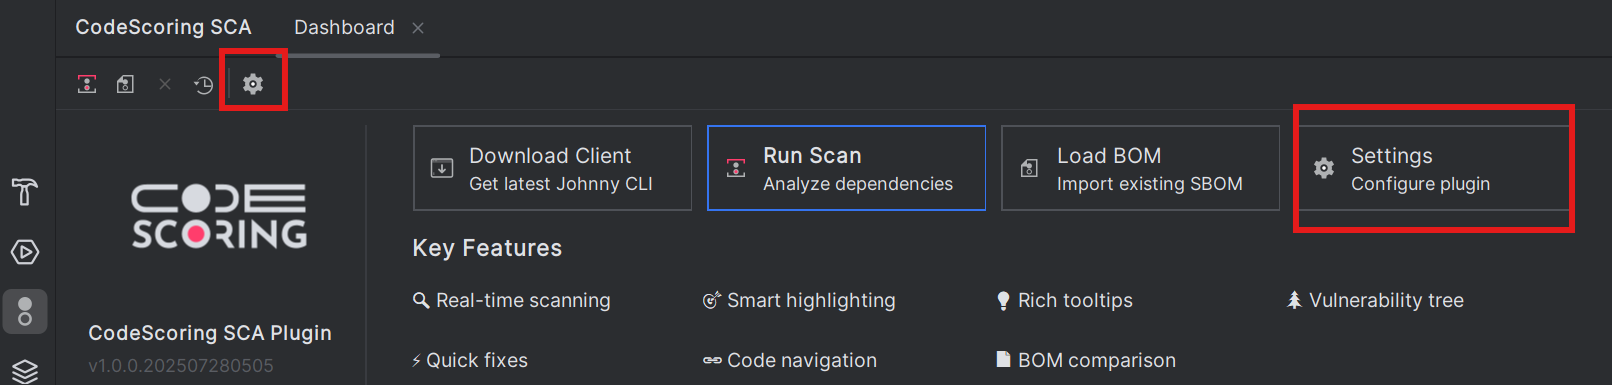
Step 4: Configure the Plugin
- In the CodeScoring SCA tool window, click the "Settings" button (gear icon) in the toolbar
- This will open the CodeScoring SCA settings page
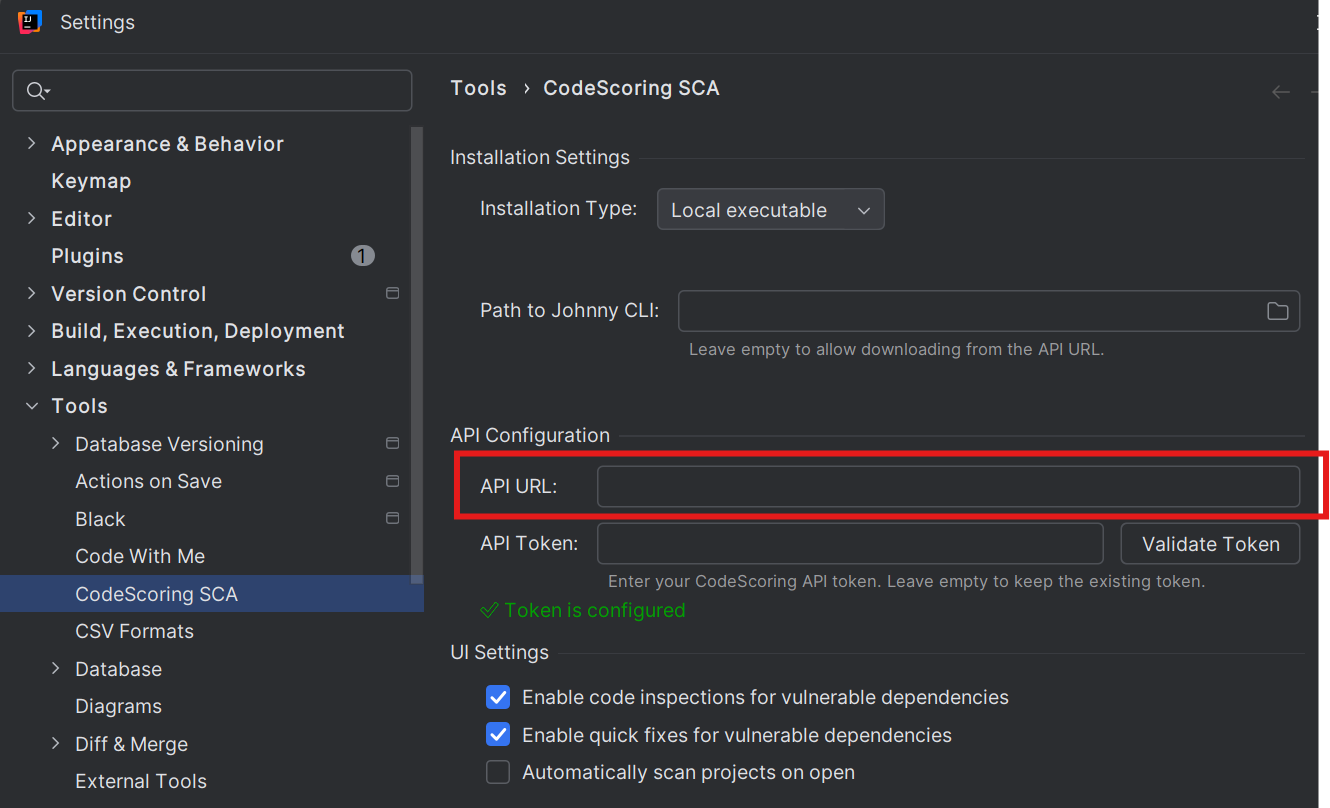
4.1 Verify the API URL
- In the settings, locate the API URL field
- You need to use the URL of CodeScoring installed in your organization. Please, contact your administrator.
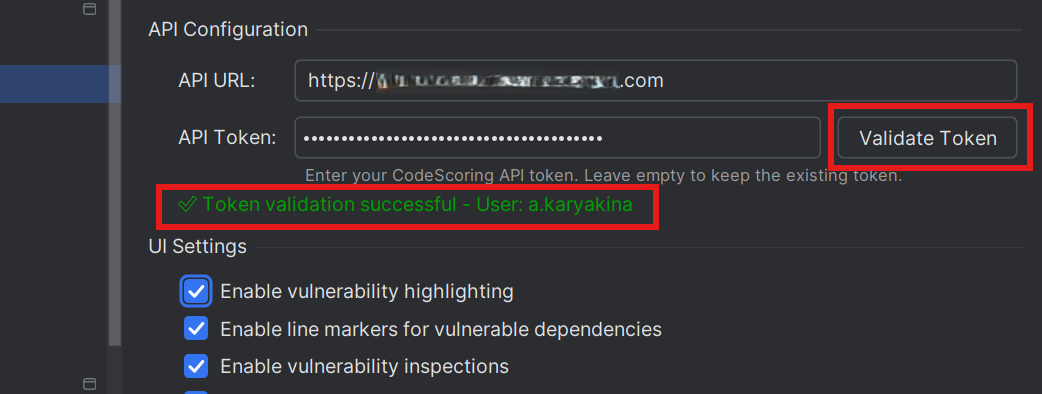
4.2 Generate and Set API Token
- Open your web browser and navigate to:
<API URL>/cabinet/profile - Log in to your CodeScoring account
- Ensure you're on your profile page
- Locate the "API token" field
- Click the "Generate" button next to the API token field
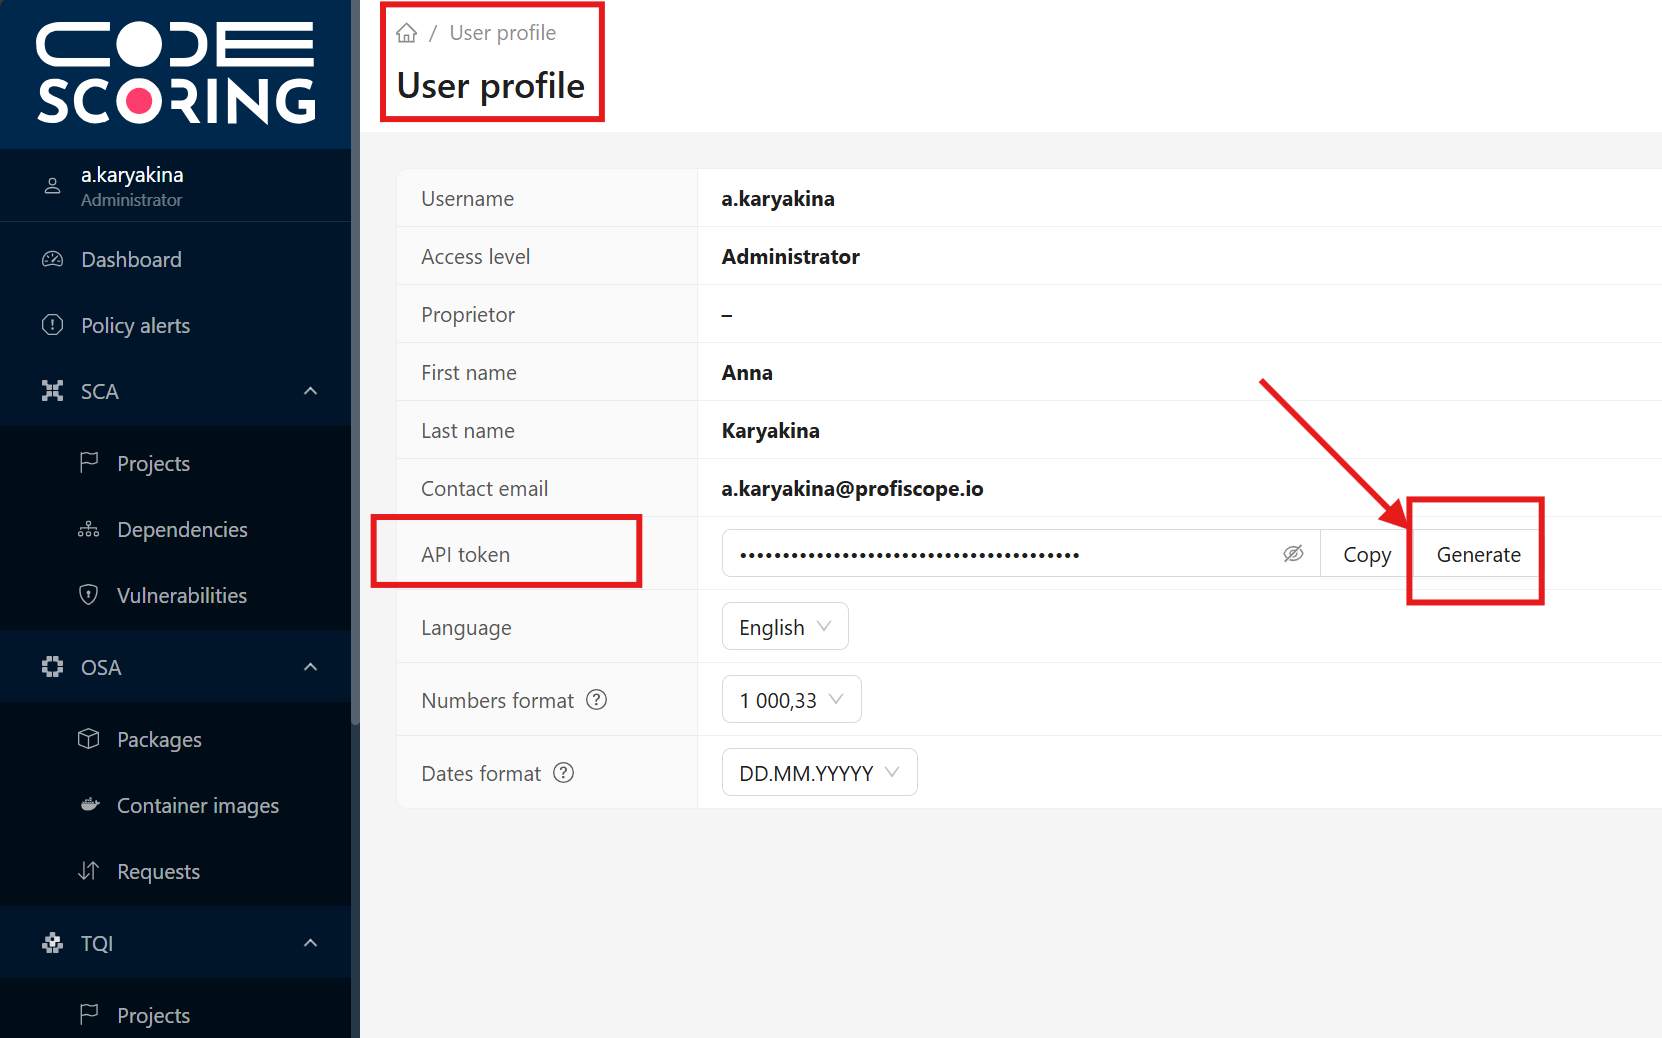
- Copy the generated API token value
- Return to IntelliJ based IDE settings
- Paste the token into the "API Token" field
- Click "Validate Token" to verify the token works
- The plugin should display confirmation that the token is valid
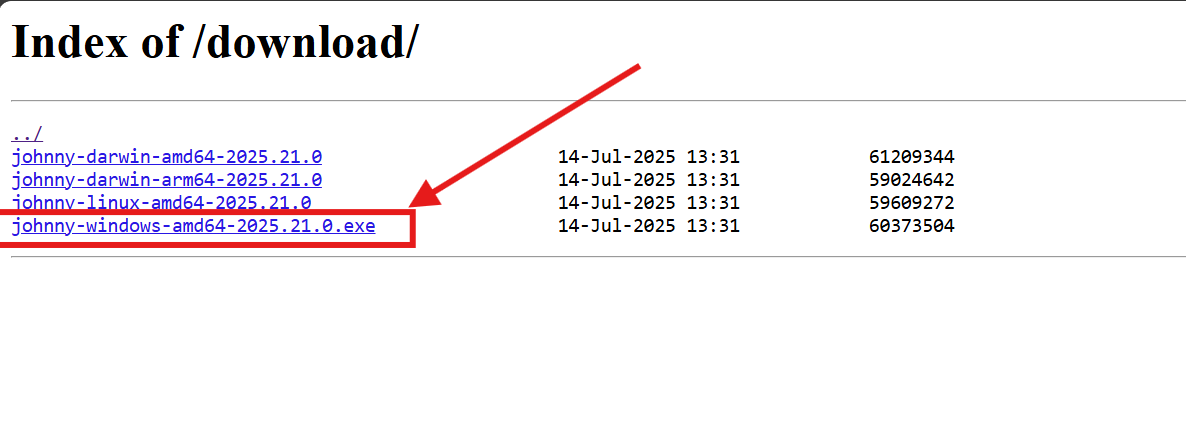
4.3 Download Johnny CLI (Optional)
- Navigate to the releases page:
<API URL>/download/(note the trailing slash) - Download the latest release executable for your operating system
4.4 Configure Johnny CLI
There are three ways to get Johnny CLI for analyzing your dependencies with our service.
4.4.1 Local Installation
Prerequisites:
- Johnny CLI must be downloaded and the file made executable on the system
- Operating system must allow running the executable file (to verify, run the file once in the console manually with the --help parameter)
Setup Steps:
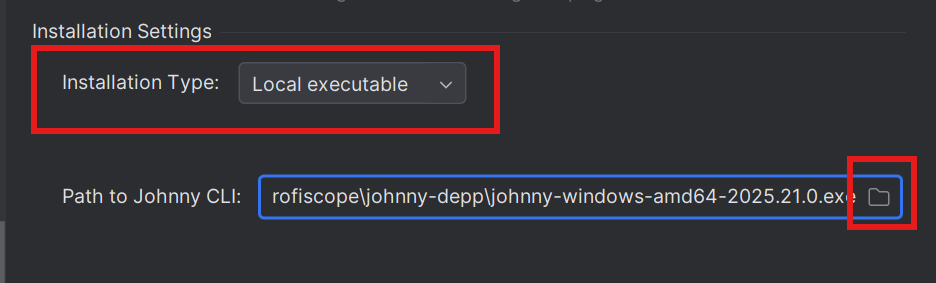
- Set installation type to Local
- In settings, select "Local executable" from the Installation Type dropdown
- In the Johnny CLI Path field, click the folder selection button
- Navigate to where you previously downloaded Johnny CLI
- Select the Johnny CLI executable file
- Click "OK" to save settings
Note: If the plugin asks about changing file permissions (chmod +x), click "Yes" to allow the plugin to make the file executable.
4.4.2 Automatic Client Download
Prerequisites:
- API URL must be configured
- API token must be configured and validation must pass successfully
Setup Steps:
- Set installation type to Local
- In settings, select "Local executable" from the Installation Type dropdown
- Leave the Johnny CLI Path field empty
- Now when scanning is first requested, Johnny CLI will be downloaded from the API URL. This will allow you to automatically get client updates as soon as they are available.
The downloaded client will be saved in the following location:
- Linux/MacOS:
~/.codescoring/johnny - Windows:
%USERPROFILE%\.codescoring\johnny.exe
- Linux/MacOS:
4.4.3 Using Docker
Docker installation allows running Johnny CLI in an isolated container, which is useful when you don't want to install it directly on your system.
Prerequisites:
- Docker must be installed and running on your system
- Your user must have permissions to execute Docker commands
Setup Steps:
- Set installation type to Docker
- In settings, select "Docker" from the Installation Type dropdown
- Configure Docker image
- Docker Image:
johnny-depp:2025.29.0(default) - Docker Registry:
<codescoring-registry-host> - Sample full image path:
sample-codescoring-registry.com/johnny-depp:2025.29.0 - Optional: Additional Docker Options Add custom Docker run options if needed in the Additional Docker Options field:
How it works:
- The client automatically mounts your project directory into the container
- Scanning is performed inside the container, and results are saved in your project
- No manual Docker commands are required - the plugin handles everything automatically
Troubleshooting Docker Installation:
- "Docker not found": Ensure Docker is installed and the
dockercommand is in your PATH - Permission denied: Add your user to the docker group:
sudo usermod -aG docker $USER - Image pull failed: Check registry credentials and network connection
- Container exits immediately: Check Event Log for detailed error messages
Step 5: Run Your First Scan
Now that the plugin is configured, you can run your first dependency scan:
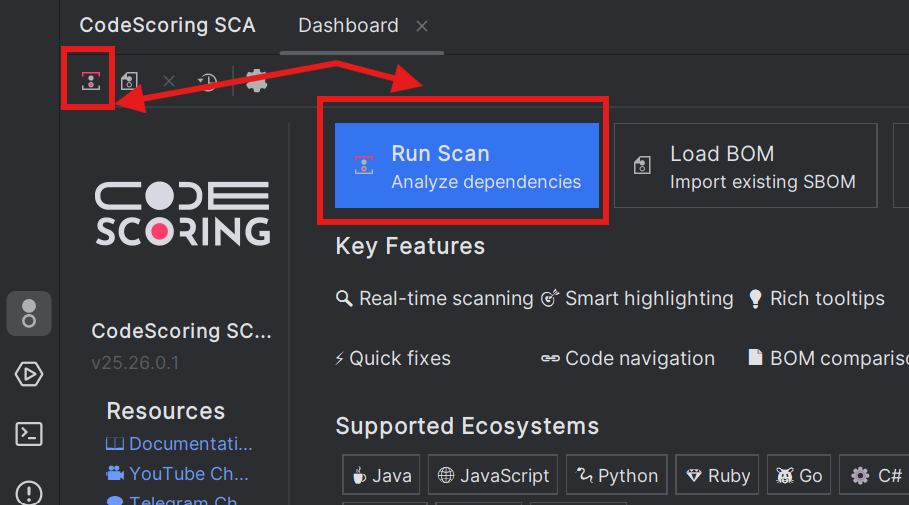
Method 1: Using the Dashboard
- Open a project in IntelliJ based IDE
- Open the CodeScoring SCA tool window
- In the Dashboard panel, click the "Run Scan" button
Method 2: Using the Main Menu
- Go to Tools → CodeScoring SCA → Run Scan
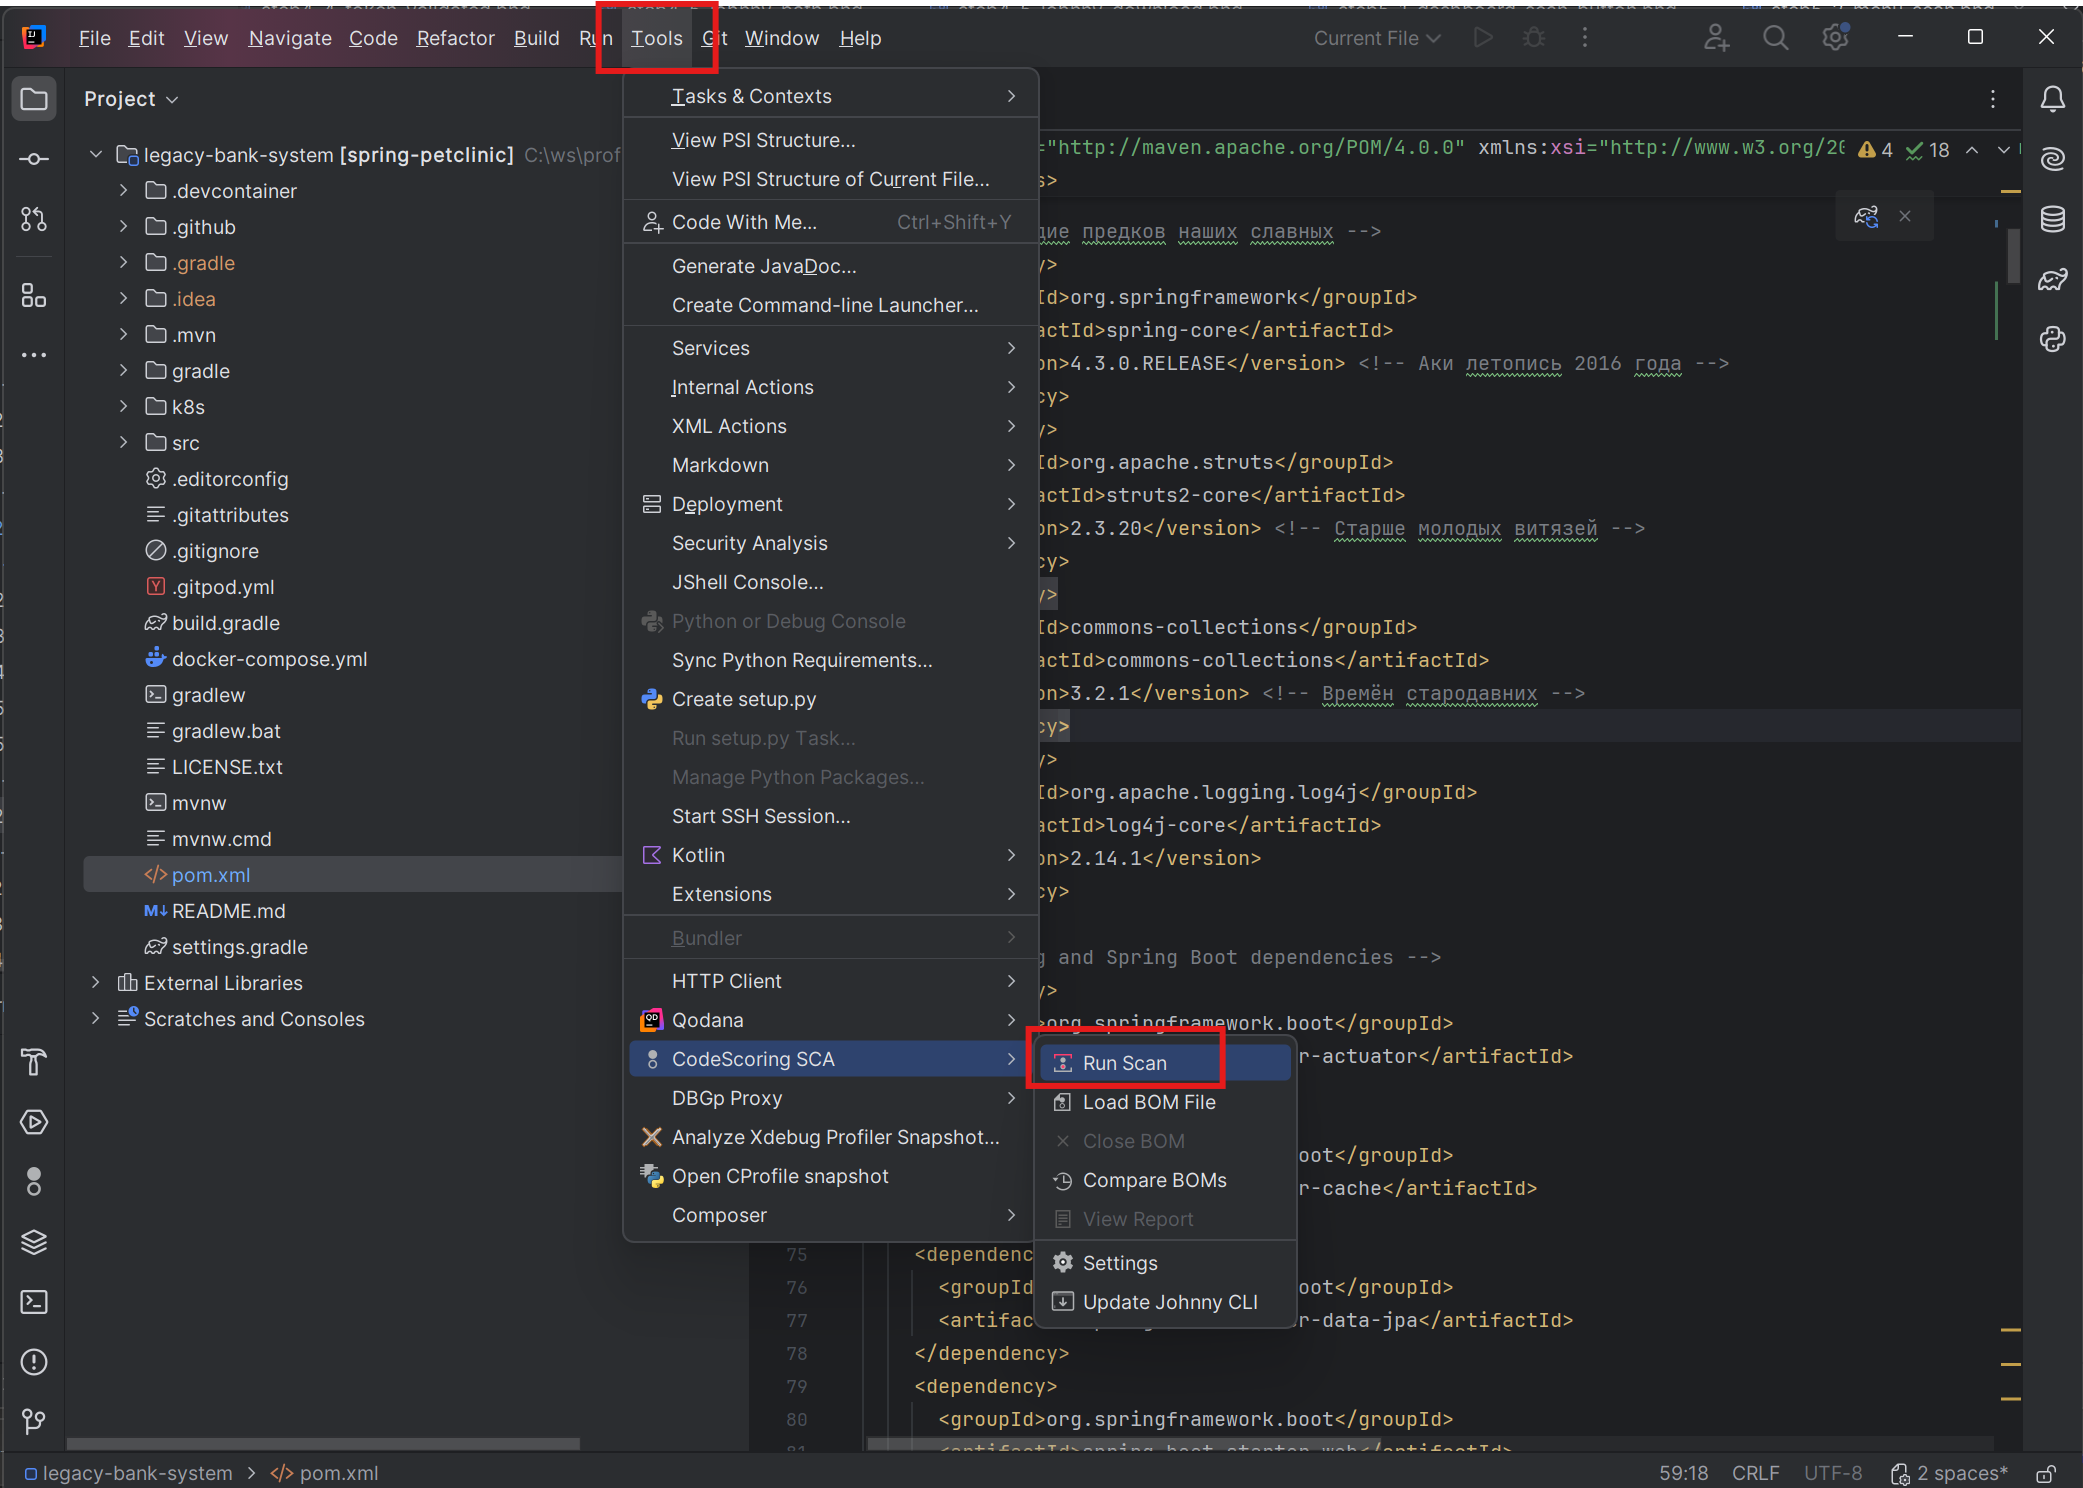
Method 3: Using the Toolbar
- Find the CodeScoring SCA plugin tab and its main toolbar
- Click the "Run Scan" button (see screenshot from method 1)
Step 6: Fine-tuning Scan Configuration
After the scan completes, you'll see a new .codescoring directory containing:
- config.yaml - configuration file for Johnny CLI, you can read about it in this section. You can modify this file as it will never be overwritten.
- donotfix.yaml - configuration file listing filename patterns that should be excluded from Quick Fix actions. You may modify this file.
- report.html - report generated in html format containing Johnny CLI output in colored table format. Overwritten during each scan.
- bom.json - scan results file created by Johnny CLI in cyclone-dx 1.6 format, it will be loaded automatically and shown in the vulnerabilities panel for any project opened in IntelliJ that has .codescoring/bom.json
- bom.json.N - where N is the scan revision, i.e. 0 is the previous scan, and 5 (for example) is the very first scan, and bom.json.0 will be used for comparison with bom.json (and shown in the DIFF tree) if it exists at the time of project opening
your-project/
├── .codescoring/
│   ├── config.yaml       # Scan configuration
│   ├── donotfix.yaml     # QuickFix configuration
│   ├── report.html       # Latest scan report
│   ├── bom.json          # Current vulnerabilities
│   ├── bom.json.0        # Previous scan (comparison)
│   └── bom.json.1        # Older scans...
├── pom.xml              # Your dependencies
└── ... your code ...
Example of Using CodeScoring Scan Configuration
Edit .codescoring/config.yaml to customize:
scan:
  general:
    ignore:           # Directories to skip
      - target
      - build
      - .idea
    with-hashes: true # Include file hashes for exact matching
    only-hashes: false # Use only hash-based detection
  dir:
    no-recursion: false # Prevents recursive scanning of root directory
Configuring Quick Fix Exclusions
The .codescoring/donotfix.yml file controls which files should not be modified by Quick Fix actions. This is particularly useful for generated files (like lock files) that should be regenerated rather than manually patched.
Example of using QuickFix Exclusion configuration:
# Lock files and generated files that should not be directly modified
patterns:
  - go.sum
  - package-lock.json
  - yarn.lock
  - Cargo.lock
  - composer.lock
  - "*.generated.*"
  - "**/generated/**"
Pattern syntax:
- Exact filename:
go.sum - Wildcard patterns:
*.lock,*-lock.json - Directory patterns:
**/node_modules/** - Multiple extensions:
*.{lock,generated}
The file is created automatically on:
- First scan in a project
- Opening a project with existing
.codescoringdirectory but nodonotfix.yml
Note: Files matching these patterns will still be scanned for vulnerabilities and shown in the results, but the Quick Fix actions (both individual and bulk) will skip them. Users should regenerate these files using their package manager commands instead.
Step 7: View Scan Results
After the scan completes:
- Check notifications: Look at the notifications in the bottom right corner of IntelliJ IDEA, clicking on "View Report" and "See details in Vulnerabilities view"
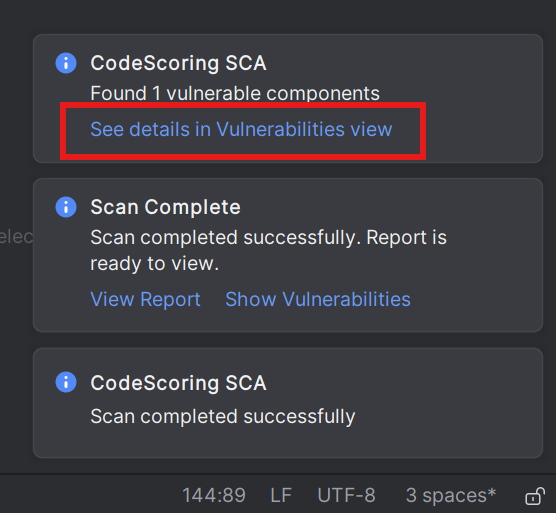
- Open vulnerabilities tree: The plugin window will automatically switch to the Vulnerabilities panel
- Review vulnerabilities: The vulnerabilities panel will show all detected security issues in your dependencies
- Explore details: You can click on individual vulnerabilities to see detailed information in the details panel
- Apply fixes: Use the "Fix All" or "Fix Selected" buttons or individual quick fixes to update vulnerable dependencies
7.1 Vulnerability Highlighting
- In-code highlighting: Vulnerable dependencies are highlighted directly in code files (build.gradle, pom.xml, package.json, etc.)
- Severity colors:
- 🔴 Critical (red)
- 🟠 High (orange)
- 🟡 Medium (yellow)
- 🔵 Low (blue)
- Multi-file support: Works with all supported file types
- Hover over highlighted dependencies to see vulnerability details

7.2 Hover Information
When hovering over highlighted dependencies, displays:
- Vulnerability ID: CVE number with link
- Severity: CVSSv3 score and level
- Description: What the vulnerability does
- Source links: Official vulnerability registration information
- Recommendations: Suggested versions to upgrade to
- Quick fix: One-click update option
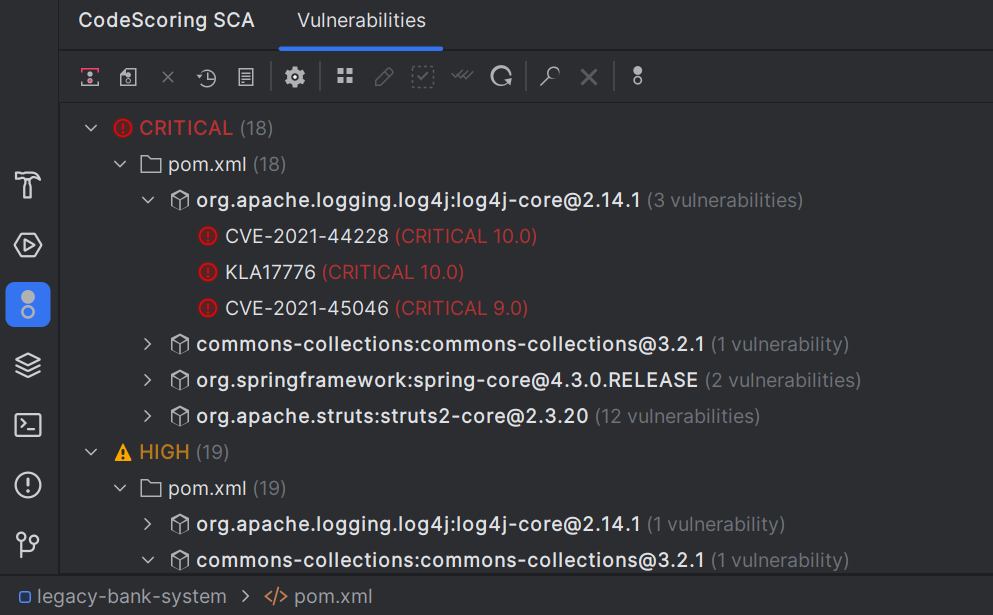
7.3 Vulnerabilities Panel
7.3.1 Tree Structure
📊 Vulnerabilities (247)
├── 🔴 Critical (12)
│   ├── CVE-2023-1234 - Remote Code Execution
│   │   ├── lodash@4.17.20
│   │   └── pom.xml:15
│   └── ...
├── 🟠 High (45)
├── 🟡 Medium (89)
└── 🔵 Low (101)
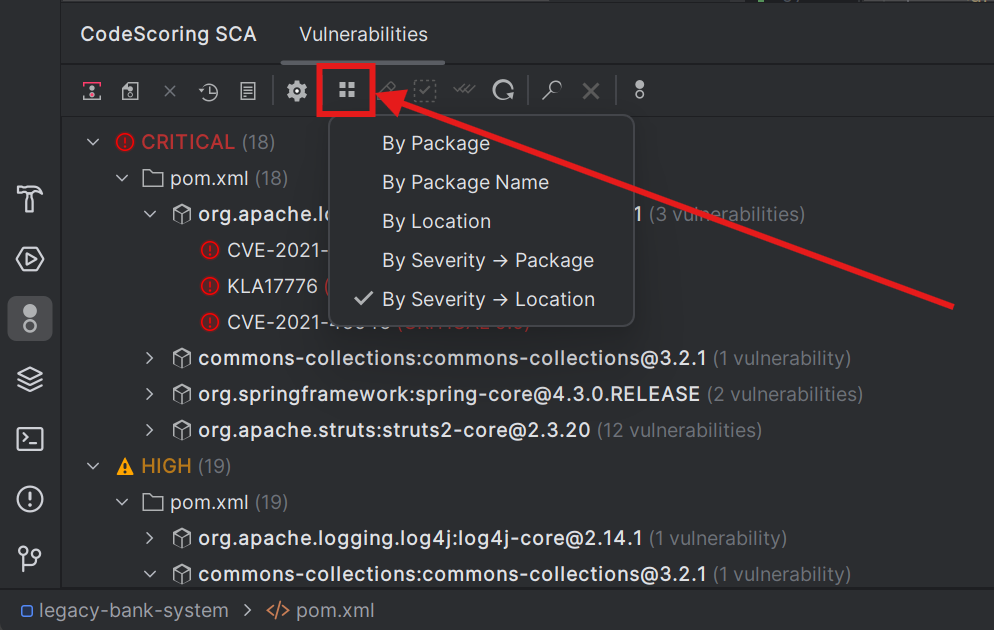
7.3.2 Grouping Options
- Use the vulnerabilities panel to filter by severity, package, or other criteria
- Group vulnerabilities by different categories for better organization
Change grouping via toolbar button or command:
- By Severity → Location → Component (default): By severity level, then by file then by package
- By Severity → Component: By severity level, then by package name alphabetically
- By Location → Component: Grouped by file path
- By Component Name → Component: Groups different versions of the same package together alphabetically
- By Component: By component (with version if known)
7.4 Search and Filtering
Search Capabilities
- Multiple fields: Search by:
- Package name (e.g., "lodash")
- CVE identifier (e.g., "CVE-2023")
- File path (e.g., "frontend/")
- Severity level
- Fuzzy matching: Finds partial matches
- Exact matching: Search for exact word match in quotes
- Case insensitive: Exact case not required
Search Toolbar
For searching and filtering, the plugin has:
- Search field: For entering search queries
- Clear button: Reset search
- Results indicator: Shows number of found items as first element of vulnerable components tree
7.5 Quick Fixes
In-code Quick Fixes
- IntelliJ lightbulb: Click the lightbulb next to a vulnerable dependency
or
- Alt+Enter: Use the hotkey when cursor is on a vulnerable dependency
or
- Update vulnerable dependency at the bottom of the vulnerable component hover card
or
- Fix Selected button on the toolbar,
then
- Choose version: If multiple safe versions are available, select the appropriate one

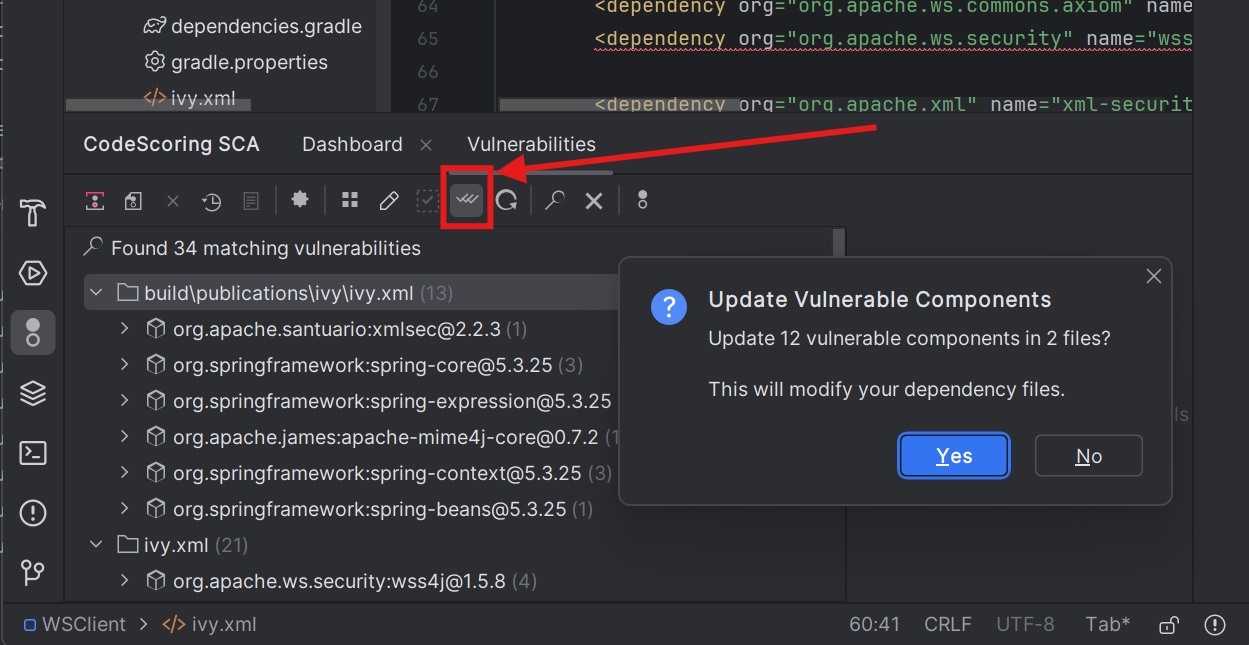
Bulk Fixes (doesn't work with severity groupings)
- Fix All button: Updates all vulnerable components with available fixes
- Intelligent update: Automatically selects the most appropriate safe version
- Change report: Shows how many dependencies were updated
- Exclusions: Respects patterns defined in
.codescoring/donotfix.yml
Important Note: Files matching patterns in donotfix.yml will be skipped during Quick Fix operations. For these files (typically lock files), use your package manager to regenerate them after updating the main dependency files.
7.6 Working with BOM Files
Auto-loading
The plugin automatically loads BOM files from:
.codescoring/bom.json(primary)bom.json(project root directory)
Manual Operations
- Load BOM: Tools → CodeScoring SCA → Load BOM File
- Close BOM: Tools → CodeScoring SCA → Close BOM
7.7 BOM Comparison
Automatic Comparison
When opening a project:
- Loads current BOM (
bom.json) - Compares with previous (
bom.json.0) - Shows change notification
Manual Comparison
- Select Tools → CodeScoring SCA → Compare BOMs
- Select base BOM file
- If BOM is already loaded, it will be used as target
- If BOM is not loaded, select target file
- Comparison result will be displayed in DIFF panel
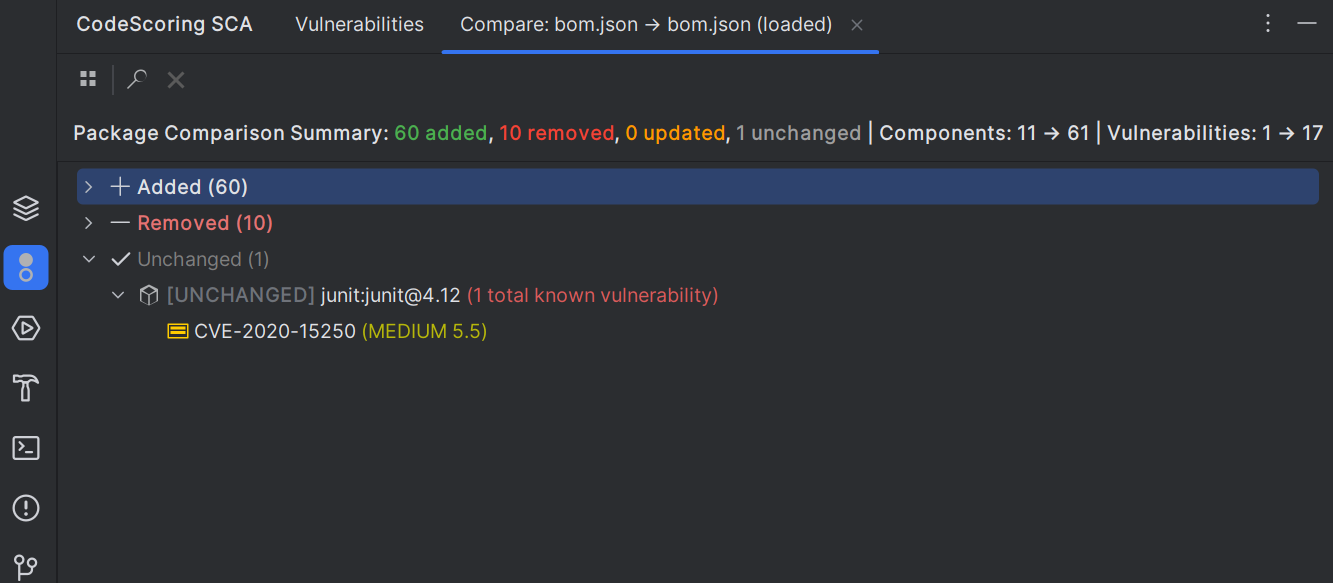
Comparison Views
📊 BOM DIFF (Changes: 23 added, 15 removed, 45 updated, 73 unchanged)
├── ➕ Added (23)
│   ├── [ADDED] react@18.1.3 0 vulnerabilities
│   └── ...
├── ➖ Removed (15)
├── 🔄 Updated (45)
│   ├── [UPDATED] lodash: 4.17.20
│   └── ...
└── ✓ Unchanged (73)
Comparison Grouping Options
- By change type: Added/Removed/Updated/Unchanged (default)
- By package: Alphabetical package grouping, most useful view for tracking changed package versions
- By location: Grouped by file path
- By severity: Grouped by vulnerability impact
Comparison Filtering
Use the search field to filter comparison results by:
- Package name
- Change type
- File path
7.8 Reports
Scan Reports
- Automatically generated: Created after each scan
- Location:
.codescoring/report.html - Format: Colored HTML with detailed information
- Content:
- Scan status
- Executed command
- Results summary
- Found vulnerabilities
- Policy warnings
- Error messages
Viewing Reports
- Command: Tools → CodeScoring SCA → View Report
- Opens in: Choice of external browser, internal preview, code editor
Step 8: Settings and Customization
Available Settings List
| Setting | Description | Default |
|---|---|---|
| API Configuration | ||
API URL |
URL of your CodeScoring installation | |
API Token |
API token. Securely stored | (set via UI) |
| Installation Settings | ||
Installation Type |
Local executable or Docker | Local executable |
Path to Johnny CLI |
Path to Johnny CLI (empty for auto-download) | (auto-download) |
Docker Image |
Docker image name | johnny-depp:2025.29.0 |
Docker Registry |
Docker registry | (provided by support) |
Additional Docker Options |
Additional Docker options | |
| UI Settings | ||
Enable vulnerability inspections |
Enable code inspections | true |
Enable quick fixes for vulnerable dependencies |
Allow quick fixes | true |
Automatically scan projects on open |
Run scan when opening project | true |
| Severity Colors | ||
Critical Color |
Color for critical vulnerabilities | (red) |
High Color |
Color for high vulnerabilities | (orange) |
Medium Color |
Color for medium vulnerabilities | (yellow) |
Low Color |
Color for low vulnerabilities | (blue) |
Unknown Color |
Color for unknown severity | (gray) |
Troubleshooting
Plugin Logs
- For detailed understanding of plugin operation, check IDE logs:
- Help → Show Log in Explorer/Finder
- Look for entries with "CodeScoring" in
idea.log
Common Issues
Installation Issues
| Issue | Solution |
|---|---|
| Plugin not visible after installation | Fully restart IntelliJ IDEA, check Settings → Plugins |
| Compatibility error | Ensure IDE version is 2024.1 or newer, check for issues in log file |
| Installation hangs | Check internet connection, try reinstalling |
Configuration Issues
| Issue | Solution |
|---|---|
| Token validation fails | Check API URL, generate new token, check proxy/VPN |
| Johnny CLI not found | Check path, access permissions, antivirus |
| Docker not working | Ensure Docker is running, check user permissions |
Scanning Issues
| Issue | Solution |
|---|---|
| Scan hangs | Check Event Log, try running Johnny CLI manually |
| No results | Ensure project contains dependency files |
| Partial results | Check configuration in .codescoring/config.yaml |
| Token errors | Check token expiration, access permissions |
Display Issues
| Issue | Solution |
|---|---|
| No highlighting | Enable in settings, reload files |
| Wrong colors | Check severity color settings |
| Missing panel | View → Tool Windows → CodeScoring SCA |
| Slow performance | Reduce pagination size in settings |
Fix Issues
| Issue | Solution |
|---|---|
| Fix fails | Check file write permissions |
| Fix is ignored | Check plugin logs and .codescoring/config.yaml |
| Wrong version | Manually specify version in file |
| Version conflicts | Fix one component at a time |
| Rollback changes | Use version control system |
Getting Help
- Check Event Log: View → Tool Windows → Event Log
- Enable debug logs:
- Help → Diagnostic Tools → Debug Log Settings
- Add
com.codescoring.intellij
- Error reports: Review
.codescoring/report.htmlfor scan details
Contact support: support@codescoring.ru
Security and Privacy, Data Handling
- Local scanning: Code is not sent to servers
- API communication: Only metadata is transmitted (your package manager configuration files)
- Token storage: Secure VS Code credential storage
Best Practices
Workflow Recommendations
- Initial setup: Full scan when starting project
- Reviews: Compare BOMs between versions
- CI/CD:
- Before commit: Run full scan
- Share configuration: Commit
.codescoring/config.yamland.codescoring/donotfix.yaml - Ignore temporary files: Add to
.gitignore: - Track main BOM: Version
.codescoring/bom.json - Standardize: Standardize plugin settings
Integration with Development Processes
-
Code Review:
- Check dependency changes
- Require critical vulnerability fixes
- Document accepted risks
-
Release Management:
- Generate reports for each release
- Track security improvements
- Plan dependency updates
-
Compliance:
- Export BOM for audit
- Track component licenses
- Maintain scan history
Working with Lock Files
-
Understanding Lock Files:
- Lock files are generated by package managers
- They should not be manually edited
- Changes should be made to manifest files instead
-
Quick Fix Behavior:
- Files matching
donotfix.ymlpatterns are skipped - Update manifest files, then regenerate lock files
- Use appropriate package manager commands, for instance:
- Go:
go mod tidy - NPM:
npm install - Yarn:
yarn install - Cargo:
cargo update
- Go:
- Files matching
-
Best Practices:
- Review
donotfix.yamland adjust patterns as needed - Document your regeneration process
- Automate lock file updates in CI/CD
- Review