CodeScoring SCA Extension for Visual Studio Code
The extension provides Software Composition Analysis (SCA) capabilities for VS Code, highlighting vulnerable dependencies in your project files and providing detailed information about vulnerabilities through integration with Johnny CLI.
The CodeScoring SCA extension supports Visual Studio Code versions 1.95.0 and higher.
Supported Ecosystems
Languages and Package Managers
| Ecosystem | Manifest Files | Lock Files |
|---|---|---|
| JavaScript/Node | package.json | package-lock.json, npm-shrinkwrap.json, yarn.lock, pnpm-lock.yaml, npm-lock.yaml |
| Python | setup.py, pyproject.toml, Pipfile, require.txt, require.pip | Pipfile.lock, poetry.lock |
| Java | pom.xml, ivy.xml, .gradle, .gradle.kts | gradle.lockfile, maven-dependency-tree.txt, gradle-dependency-tree.txt |
| Ruby | Gemfile, gems.rb, *.gemspec | Gemfile.lock, gems.locked |
| Go | go.mod | go.sum |
| Rust | Cargo.toml | Cargo.lock |
| PHP | composer.json | composer.lock |
| C#/.NET | .csproj, packages.config, Project.json, paket.dependencies, .nuspec | packages.lock.json, Project.lock.json, paket.lock, project.assets.json, dependencyReport.json |
| Swift | Package.swift | Package.resolved |
| Objective-C | Podfile, *.podspec | Podfile.lock |
| Conda | environment.yml, environment.yaml, meta.yml, meta.yaml | conda-lock.yml |
| Conan (C/C++) | conanfile.txt, conanfile.py | conan.lock |
Default File Detection
- Automatic: Scans all supported files
- Recursive: Searches in subdirectories
Fine-tuning the scan is done by modifying the config.yaml file
Getting Started
Prerequisites
Before you begin, ensure you have:
- Visual Studio Code installed on your system
- Access to a CodeScoring installation with active credentials
- The codescoring-sca extension distribution for vscode (.vsix)
Required Permissions
- File system: Read project files, write .codescoring files, download executable, execute downloaded CLI
- Network: Communication with CodeScoring API
- VS Code API: Editor integration
Step 1: Download the Extension
The extension is provided as a platform-independent file codescoring-sca-<version>.vsix.
Step 2: Install the Extension from VSIX File
- Open Visual Studio Code
- Go to File → Preferences → Extensions (or press
Ctrl+Shift+XorCmd+Shift+Xon Mac) - Click on the three dots (...) menu in the top-right corner of the Extensions panel
- Select "Install from VSIX..." from the dropdown menu
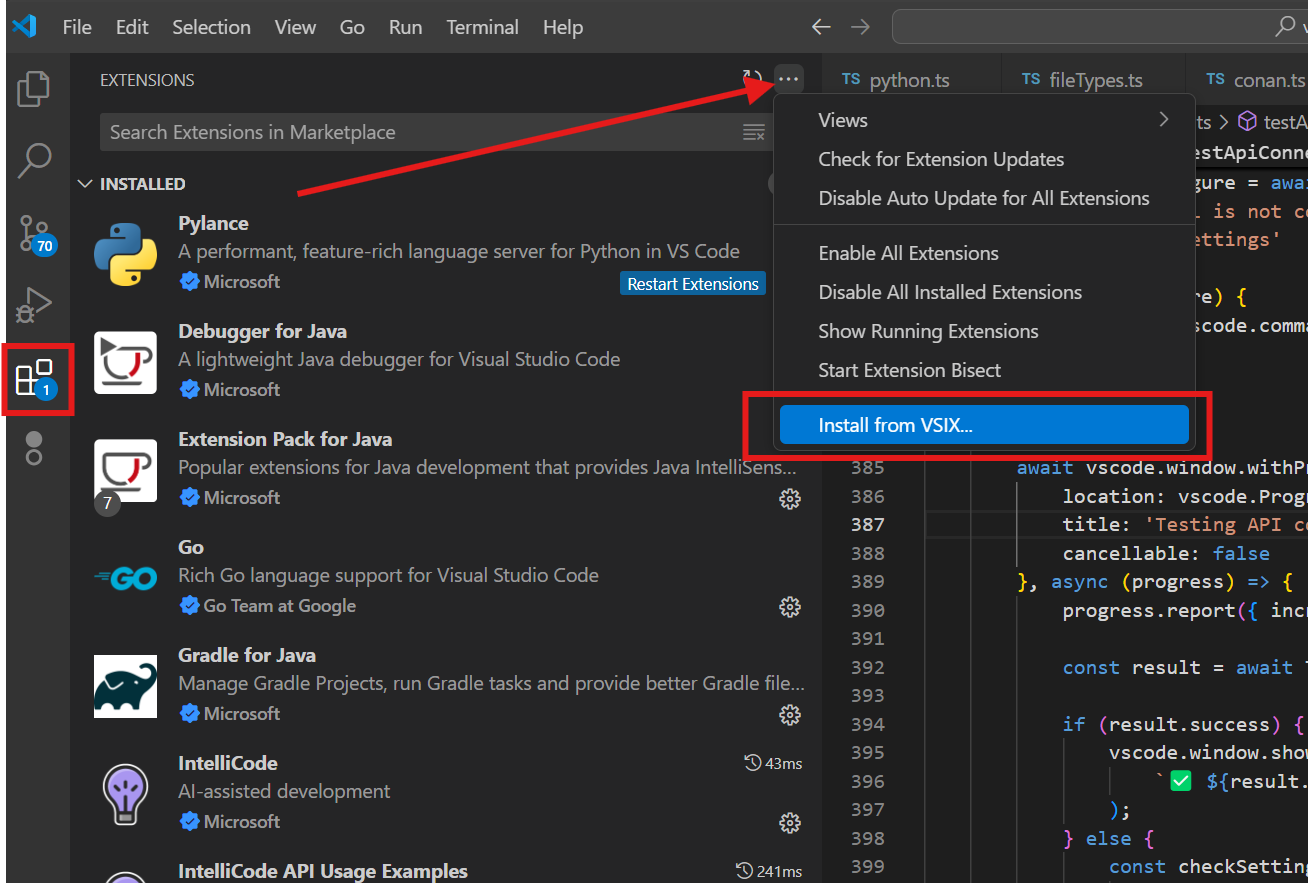
- Navigate to where you saved the
.vsixfile - Select the file and click "Install"
- Wait for the installation to complete
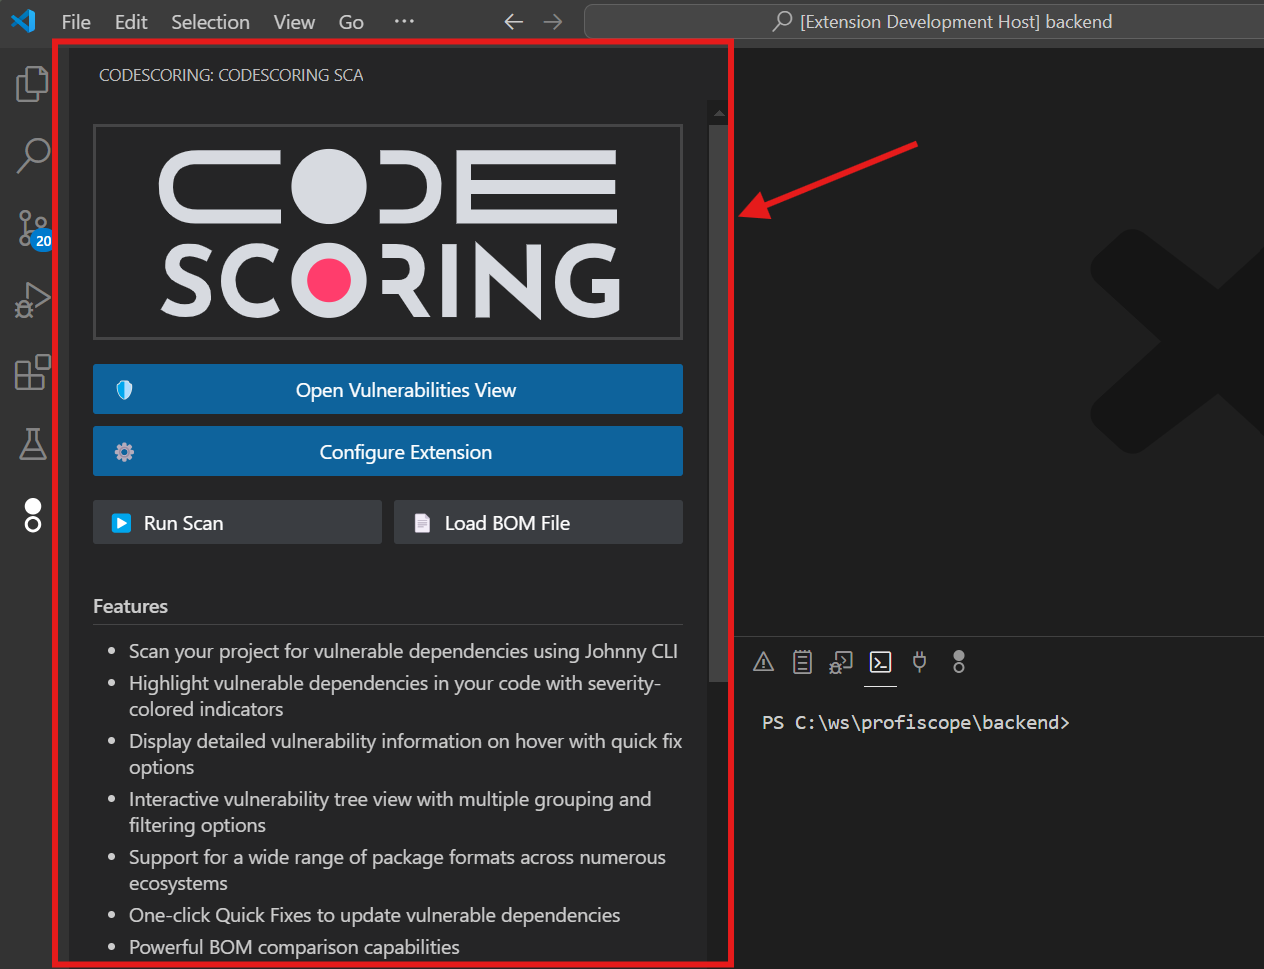
Step 3: Locate the CodeScoring Extension
After installation, you should see the CodeScoring logo in the VS Code Activity Bar (left sidebar).
![]()
- Click on the CodeScoring icon in the Activity Bar
- The "CODESCORING: CODESCORING SCA" sidebar panel will open
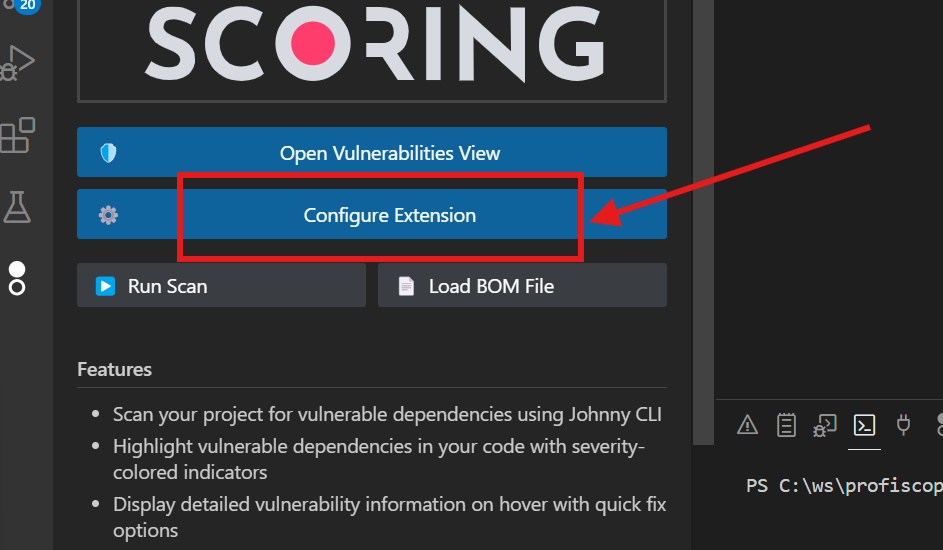
Step 4: Configure the Extension
- In the CodeScoring SCA sidebar panel, click the "Configure Extension" button
- The CodeScoring SCA settings page will open
4.1 Verify the API URL
- In the settings, locate the API URL field
- You need to use the URL for CodeScoring installed in your organization. Please, contact your administrator.
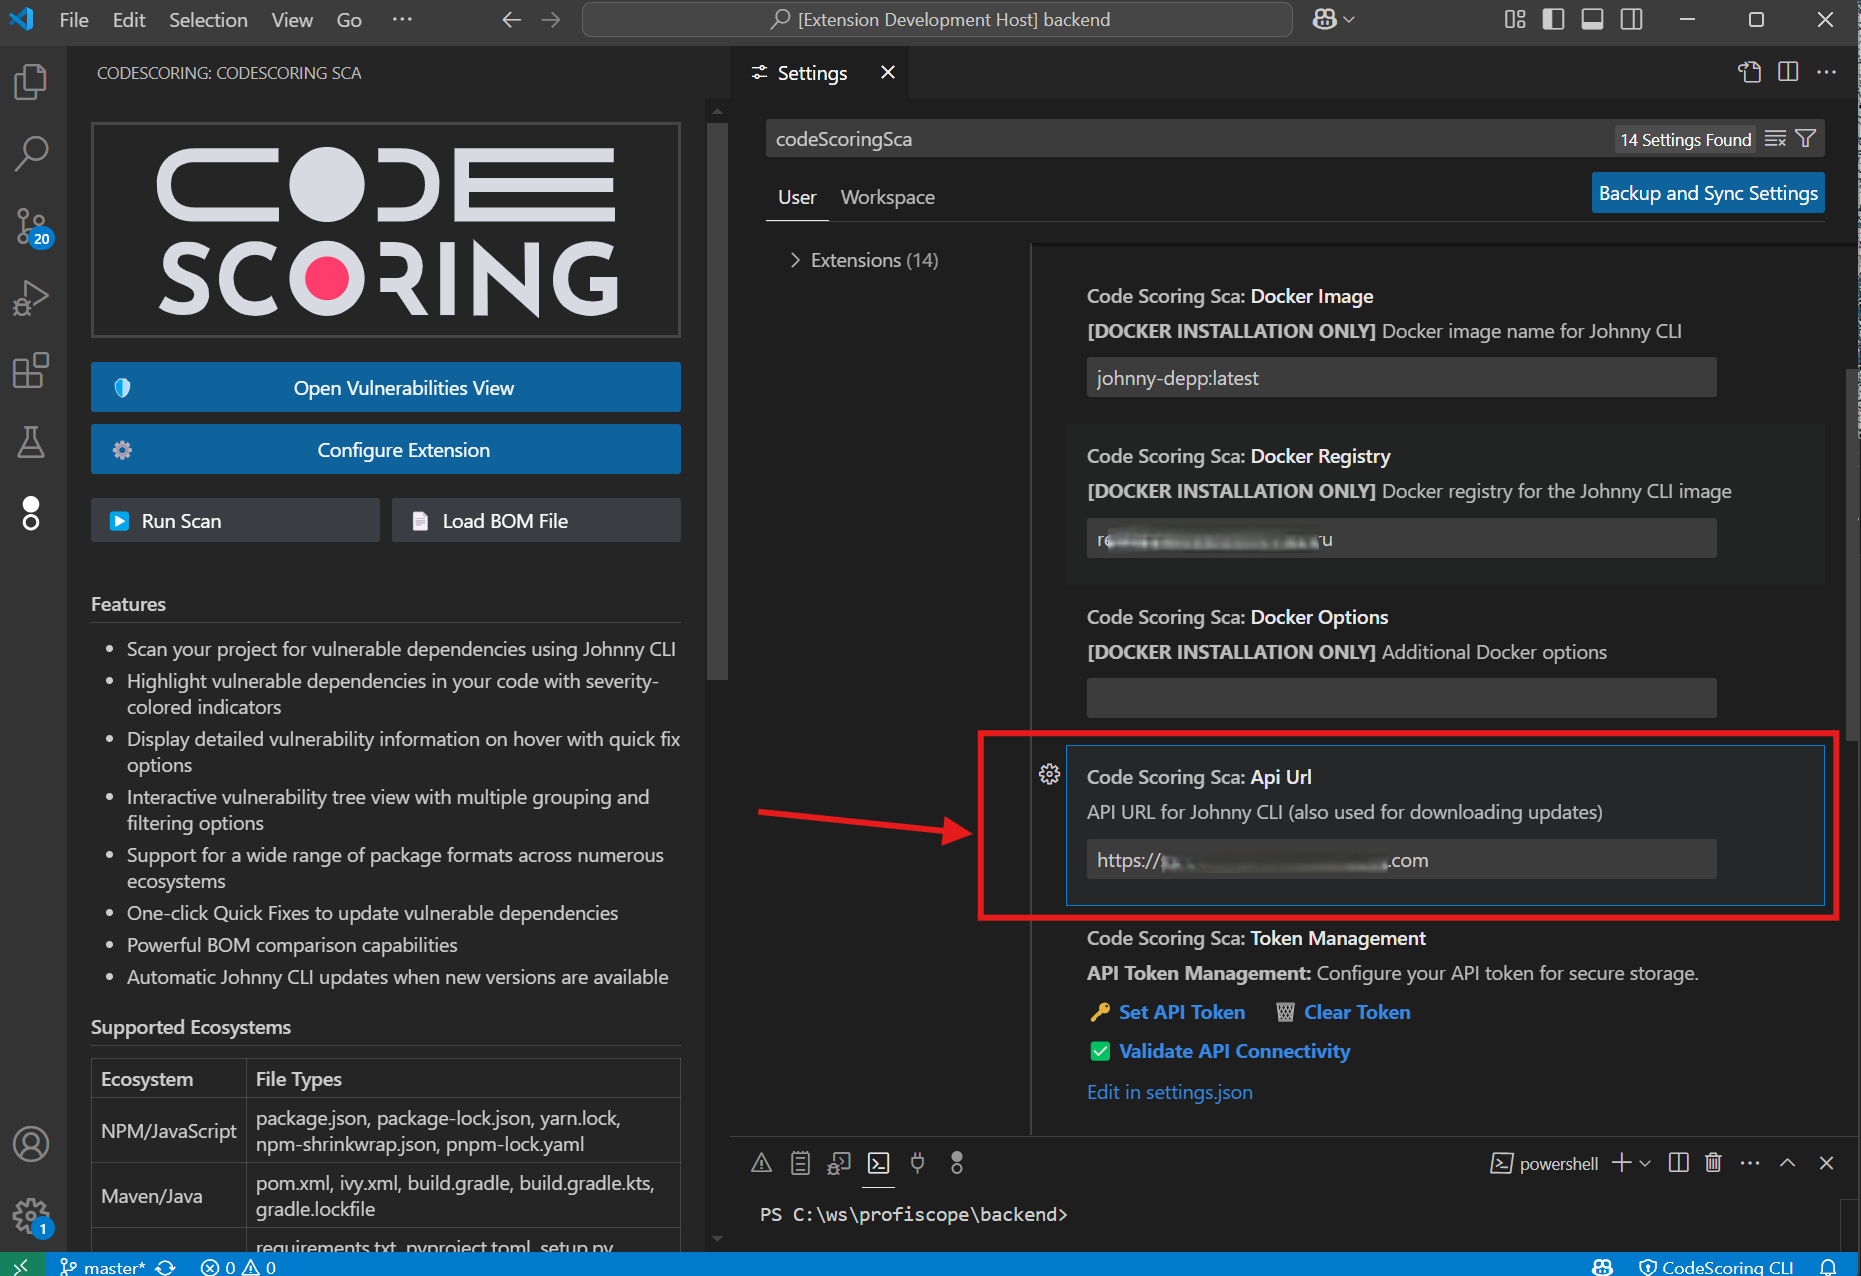
4.2 Generate and Set the API Token
- Open a web browser and navigate to:
<API URL>/cabinet/profile - Log into your CodeScoring account
- Ensure you're on your profile page
- Find the "API token" field
- Click the "Generate" button next to the API token field
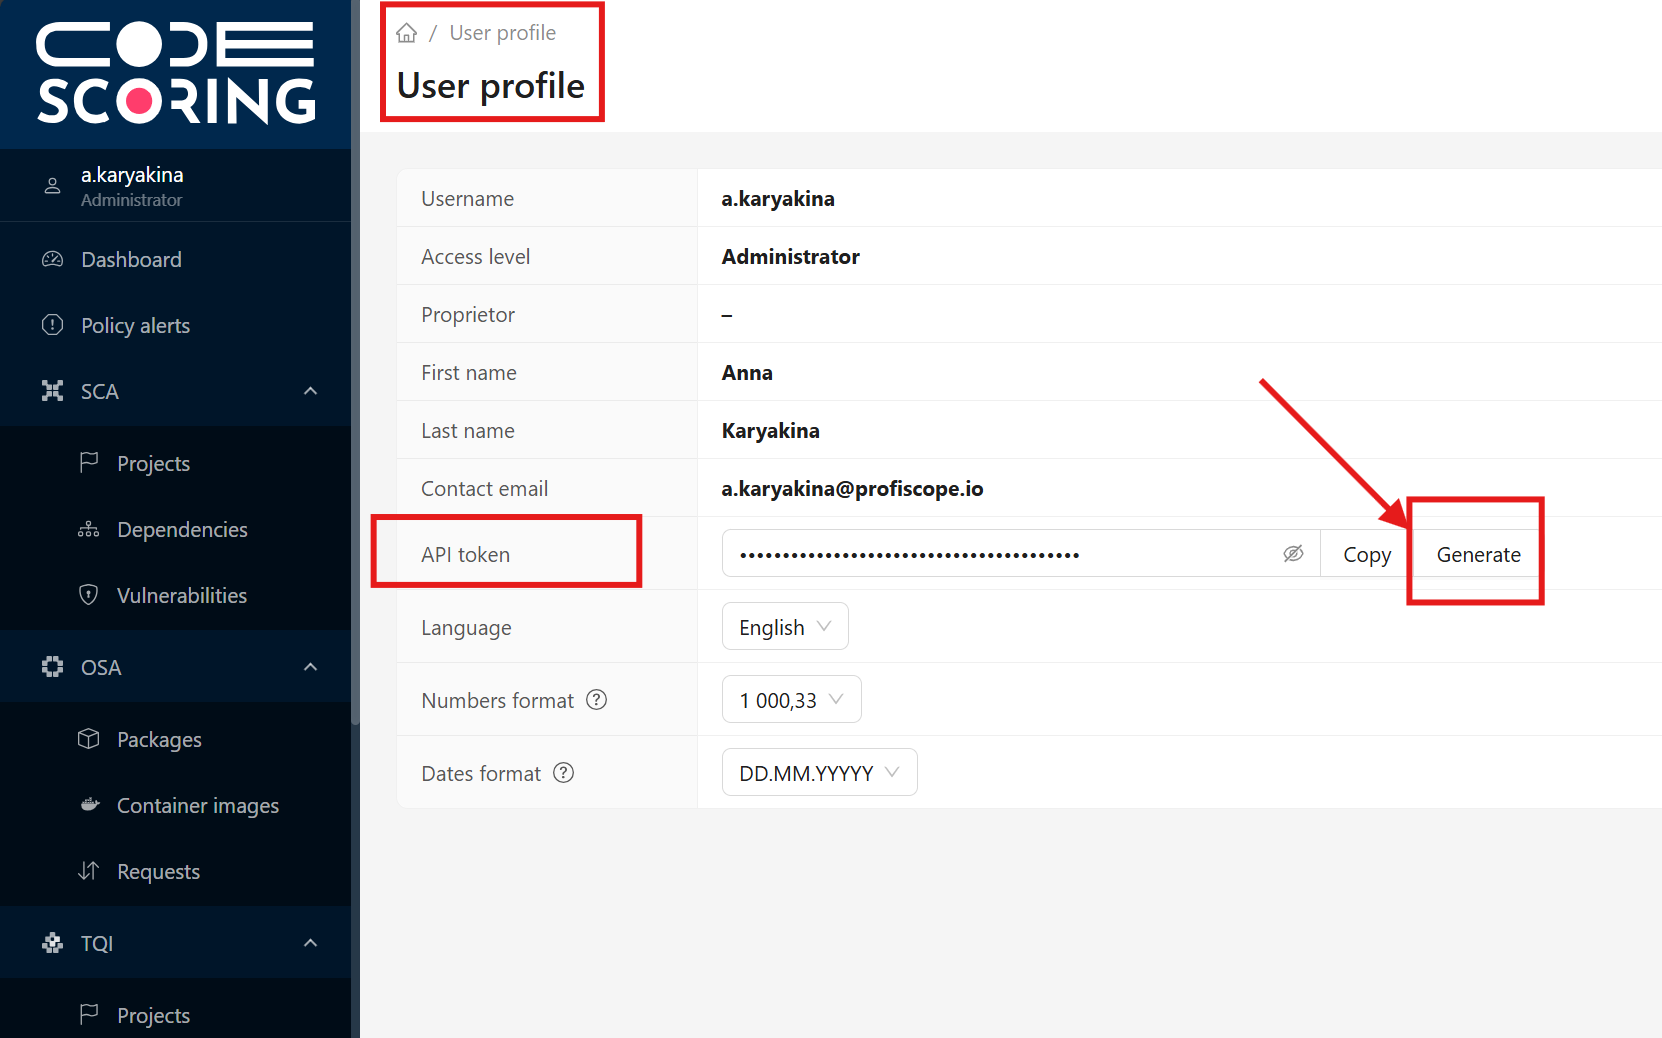
- Copy the generated API token value
- Return to VS Code settings
- Click on the "Set API Token" link in the plugin settings
- Paste the copied token when prompted
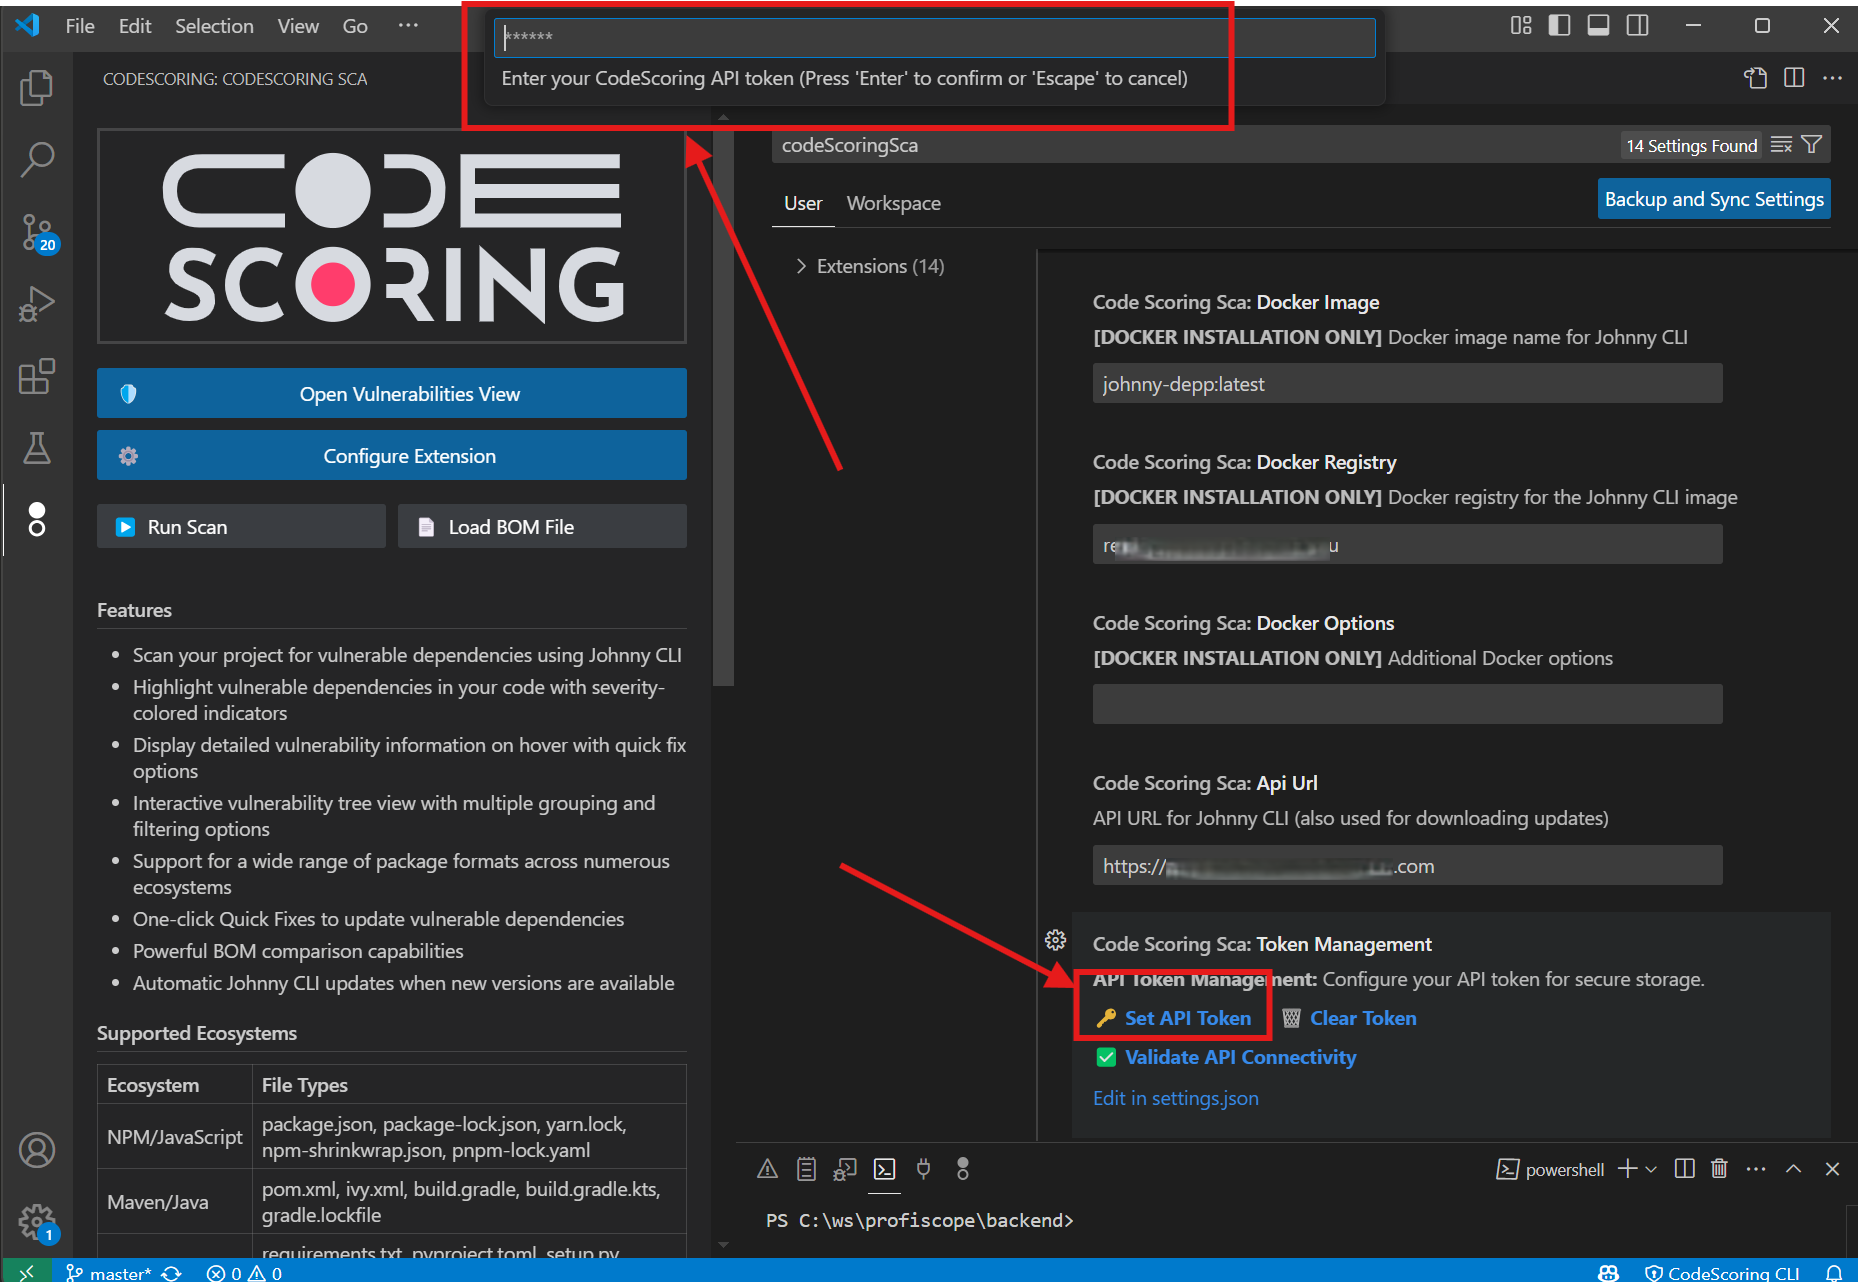
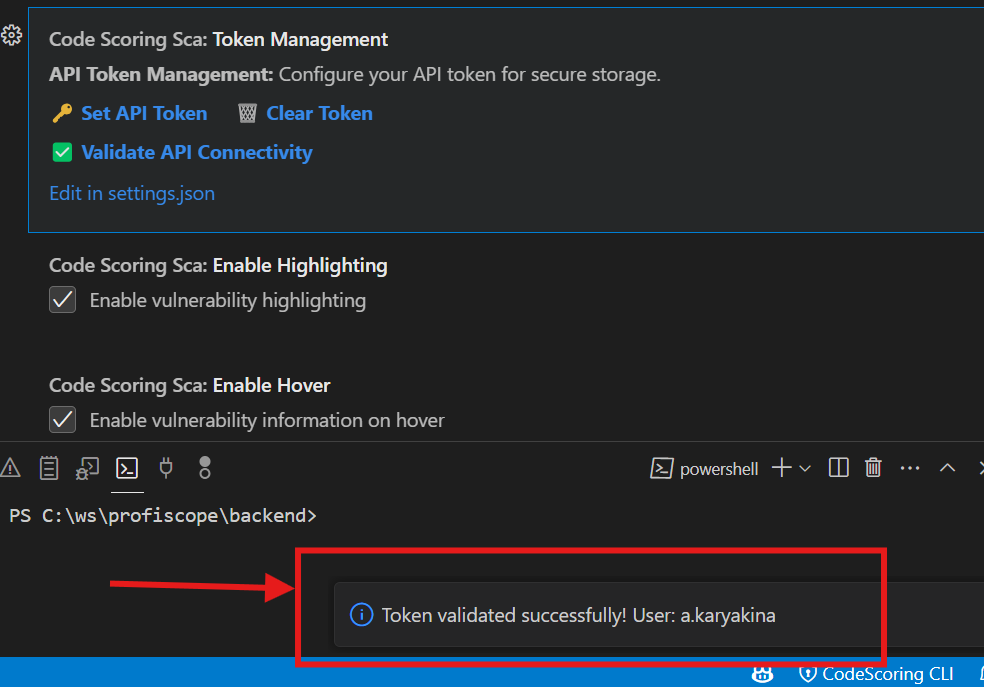
- The plugin should display confirmation that the token is valid
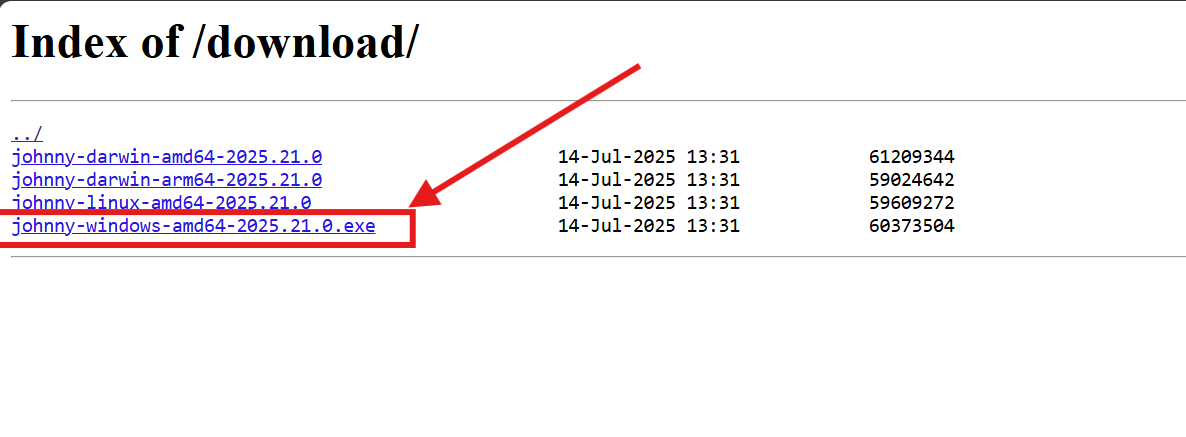
4.3 Download Johnny CLI (Optional)
- Navigate to the downloads page:
<API URL>/download/(note the trailing slash) - Download the latest release executable for your operating system
4.4 Configure Johnny CLI
There are three ways to obtain Johnny CLI for analyzing your dependencies with our service.
4.4.1 Local Installation
Prerequisites:
- Johnny CLI must be downloaded and the file made executable on the system
- The operating system must allow running the executable file (to verify, run the file once in the console with the --help parameter manually)
Setup Steps:
- Set the installation type to Local
- In VS Code settings, change
installationTypetolocal - Or in settings.json:
- In the settings, find the
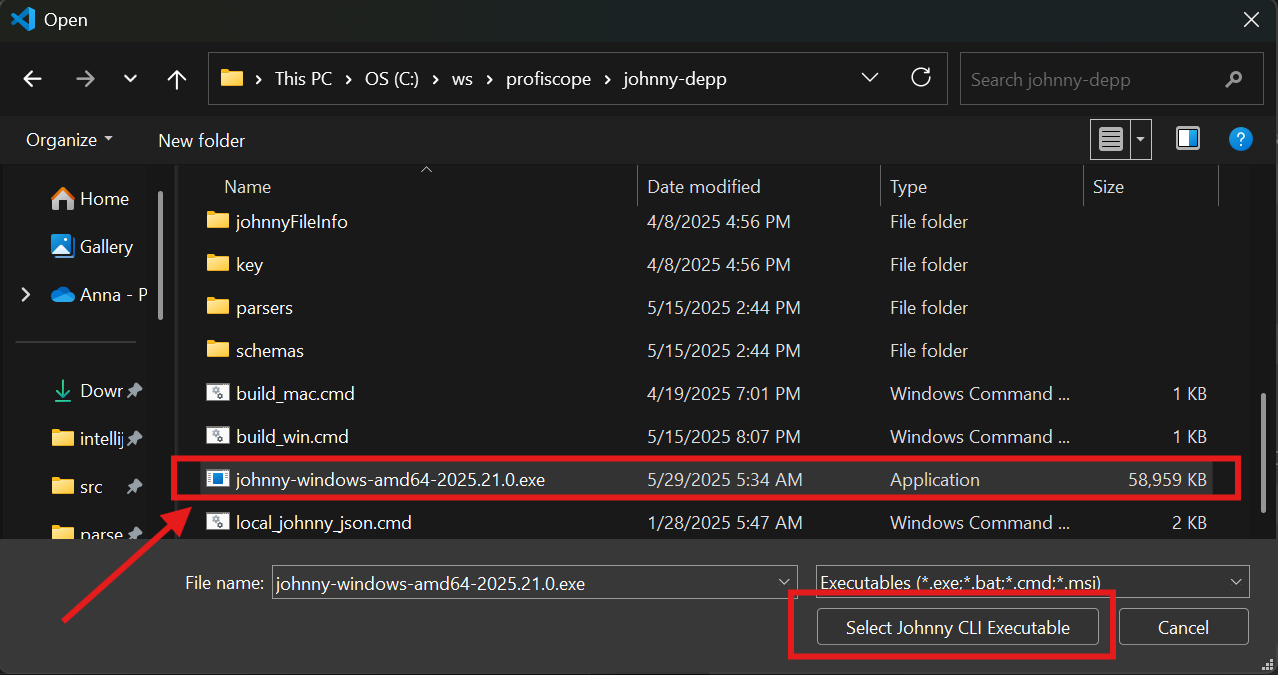
Codescoring Sca: Johnny Cli Pathfield marked [LOCAL INSTALLATION ONLY] - Click on the "Browse..." action link
- Navigate to where you previously downloaded Johnny CLI
- Select the Johnny CLI executable file
Note: If the plugin asks about changing file permissions (chmod +x), click "Yes" to allow the plugin to make the file executable.
4.4.2 Automatic Client Download
Prerequisites:
- API URL must be configured
- API token must be configured and validation must pass successfully
Configuration Steps:
- Set the installation type to Local
- In VS Code settings, change
installationTypetolocal - Or in settings.json:
- In the settings, find the
Codescoring Sca: Johnny Cli Pathfield marked [LOCAL INSTALLATION ONLY] - Clear the value in this field if necessary (empty value is the default)
- Now on the first scan request, Johnny CLI will be downloaded from the API URL. This will allow you to automatically receive client updates as soon as they become available. The downloaded client will be saved in the following location:
- Linux:
~/.config/Code/User/globalStorage/CodeScoring.codescoring-sca/johnny - Windows:
%APPDATA%\Code\User\globalStorage\CodeScoring.codescoring-sca\johnny.exe - MacOS:
~/Library/Application Support/Code/User/globalStorage/CodeScoring.codescoring-sca/johnny
- Linux:
4.4.3 Using Docker
Docker installation allows running Johnny CLI in an isolated container, which is useful when you don't want to install it directly on your system.
Prerequisites:
- Docker must be installed and running on your system
- Your user must have permissions to execute Docker commands
Configuration Steps:
- Set the installation type to Docker
- In VS Code settings, change
installationTypetodocker - Or in settings.json:
- Configure the Docker image
- Image:
johnny-depp:2025.29.0(default) - Registry:
<codescoring-registry-host> - Sample full image path:
sample-codescoring-registry.com/johnny-depp:2025.29.0 - Optional: Additional Docker Options Add custom Docker run options if needed:
How it works:
- The extension automatically mounts your project directory into the container
- Scanning is performed inside the container, with results saved to your project
- No manual Docker commands are required - the extension handles everything automatically
Example Docker Configuration:
{
  "codescoringSca.installationType": "docker",
  "codescoringSca.dockerImage": "johnny-depp:2025.29.0",
  "codescoringSca.dockerRegistry": "sample-codescoring-registry.com",
  "codescoringSca.dockerOptions": ""
}
Troubleshooting Docker Installation:
- "Docker not found": Ensure Docker is installed and the
dockercommand is in your PATH - Permission denied: Add your user to the docker group:
sudo usermod -aG docker $USER - Image pull failed: Check registry credentials and network connection
- Container exits immediately: Check VS Code Output panel for detailed error messages
Step 5: Run Your First Scan
Now that the extension is configured, you can run your first scan for vulnerable dependencies:
Method 1: Using the Sidebar Panel
- Open a project folder in VS Code
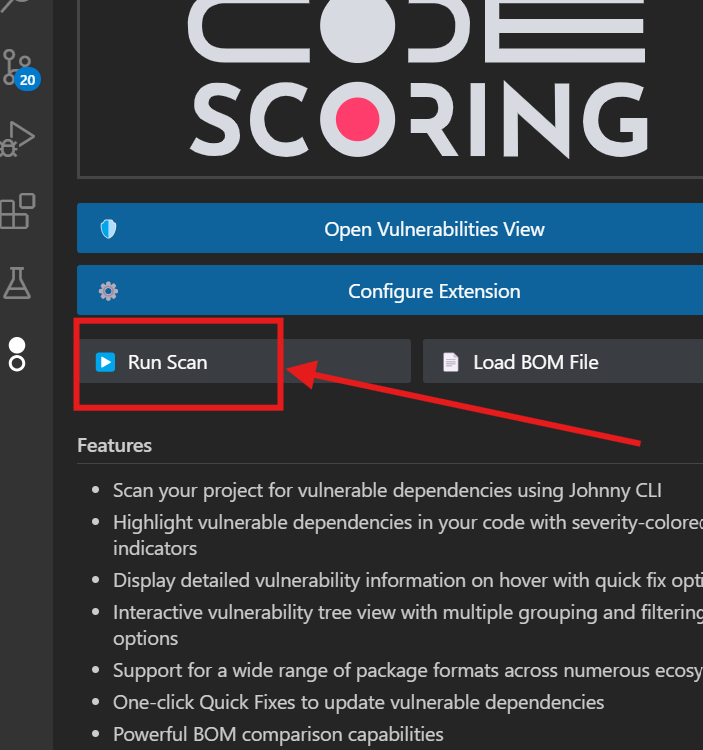
- Click on the CodeScoring icon in the Activity Bar
- In the "CODESCORING: CODESCORING SCA" sidebar panel, click the "Run Scan" button
Method 2: Using the Command Palette
- Press
Ctrl+Shift+P(orCmd+Shift+Pon Mac) to open the Command Palette - Type "Run Johnny CLI Scan"
- Select "CodeScoring SCA: Run Johnny CLI Scan" from the list

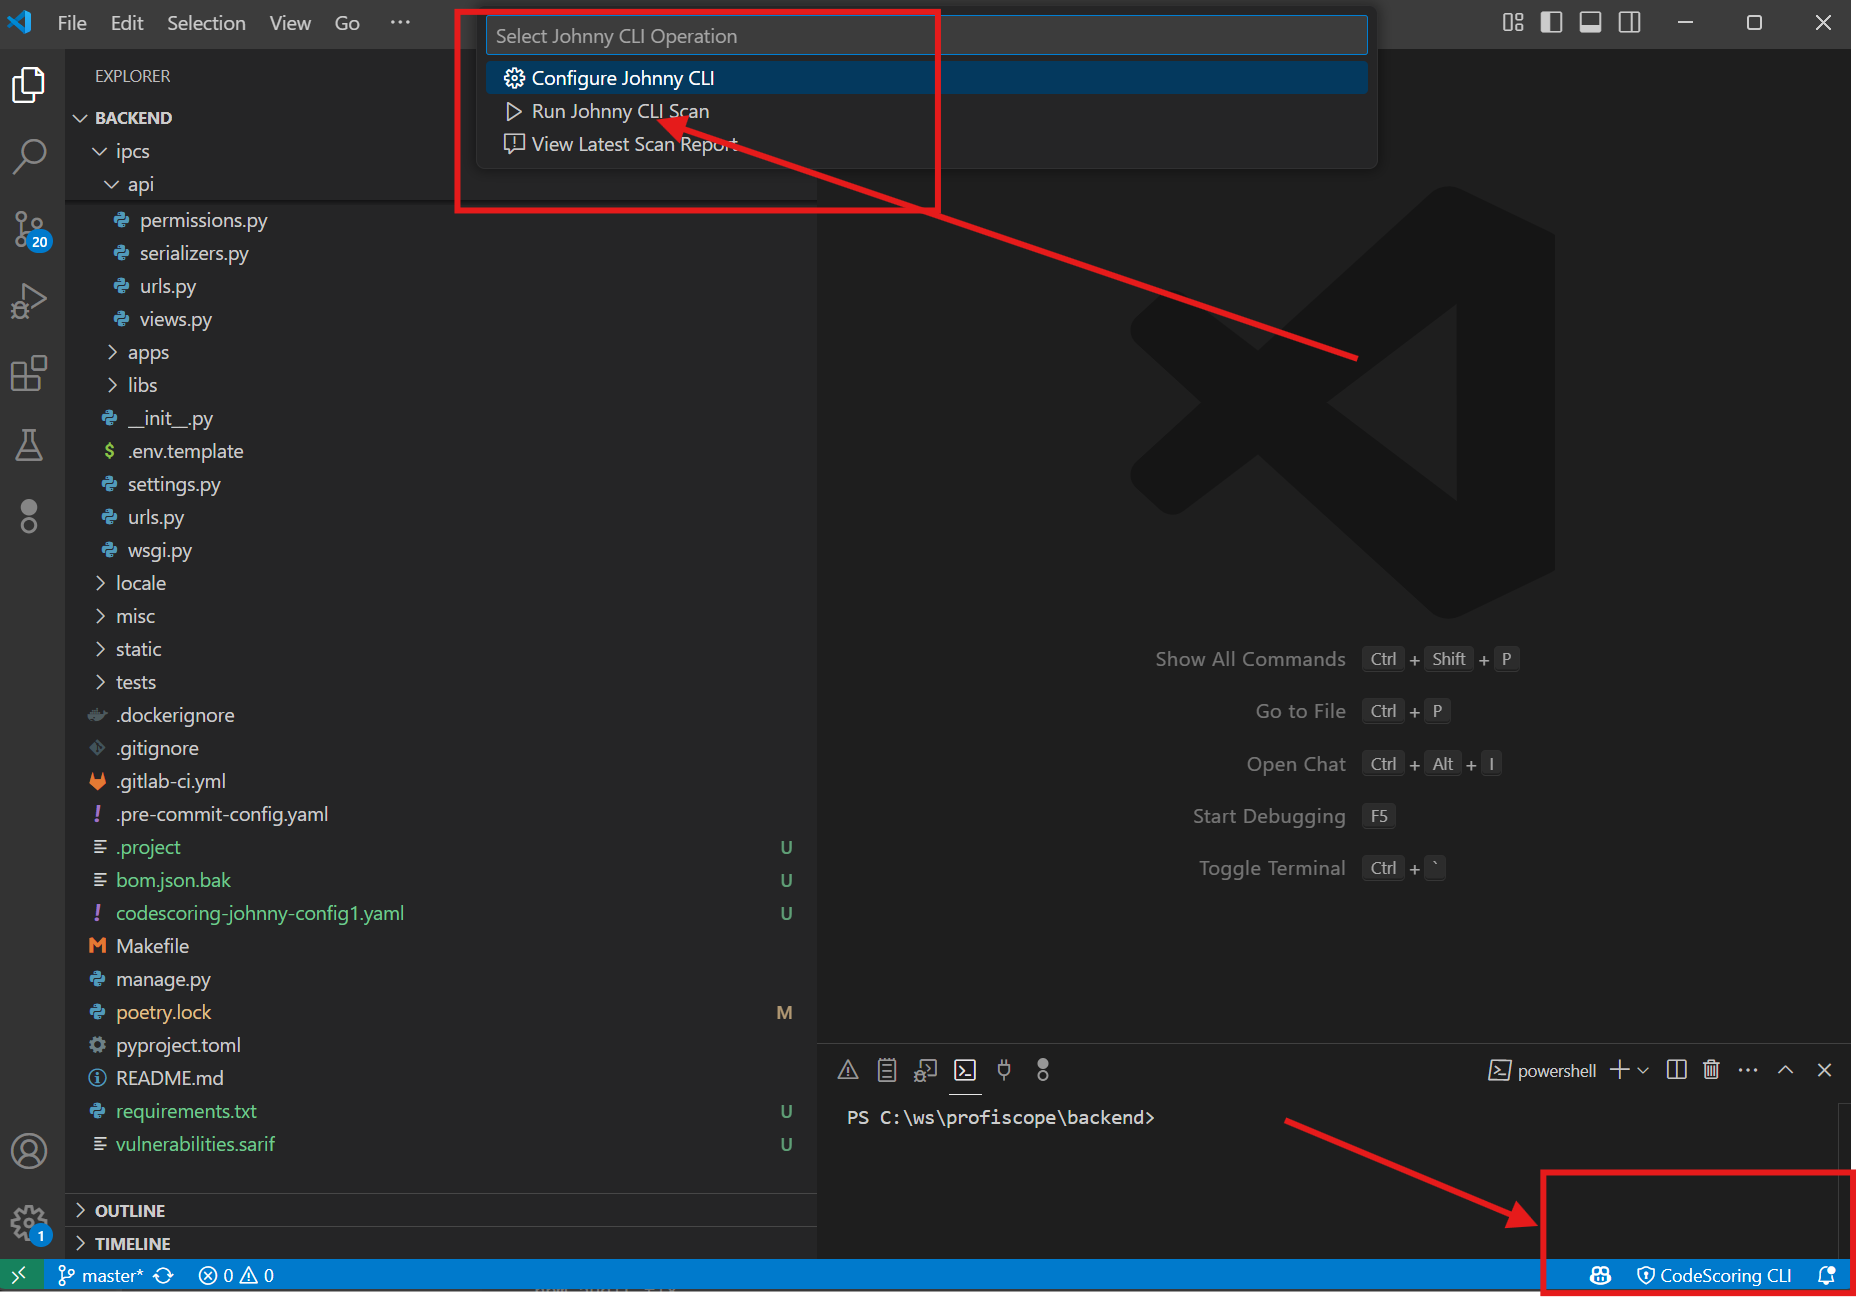
Method 3: Using the Status Bar
- Look at the bottom status bar of VS Code
- Find the "CodeScoring CLI" indicator
- Click on it to open the Johnny CLI menu
- Select "Run Johnny CLI Scan" from the list
Step 6: Fine-tuning the Scan Configuration
After the scan completes, you'll see a new .codescoring directory containing:
- config.yaml - configuration file for Johnny CLI, you can read about it in this section. You can modify this file as it will never be overwritten.
- report.html - report generated in html format containing Johnny CLI output in colored table format. Overwritten during each scan.
- bom.json - scan results file created by Johnny CLI in cyclone-dx 1.6 format, it will be loaded automatically and shown in the vulnerabilities panel for any directory opened in VSCode that has .codescoring/bom.json
- bom.json.N - where N is the scan revision, i.e., 0 is the previous scan, and 5 (for example) is the very first scan, and bom.json.0 will be used for comparison with bom.json (and shown in the DIFF tree) if it exists when opening a new folder
your-project/
├── .codescoring/
│   ├── config.yaml       # Scan configuration
│   ├── report.html       # Latest scan report
│   ├── bom.json          # Current vulnerabilities
│   ├── bom.json.0        # Previous scan (comparison)
│   └── bom.json.1        # Older scans...
├── package.json          # Your dependencies
└── ... your code ...
Example Usage of CodeScoring Scan Configuration
Edit .codescoring/config.yaml to customize:
scan:
  general:
    ignore:           # Ignore paths
      - node_modules
      - .git
      - test
    with-hashes: true # Include file hashes for exact matching
    only-hashes: false # Use only hash-based detection
  dir:
    no-recursion: false # Prevents from recursively scan directories
Step 7: View Scan Results
After the scan completes:
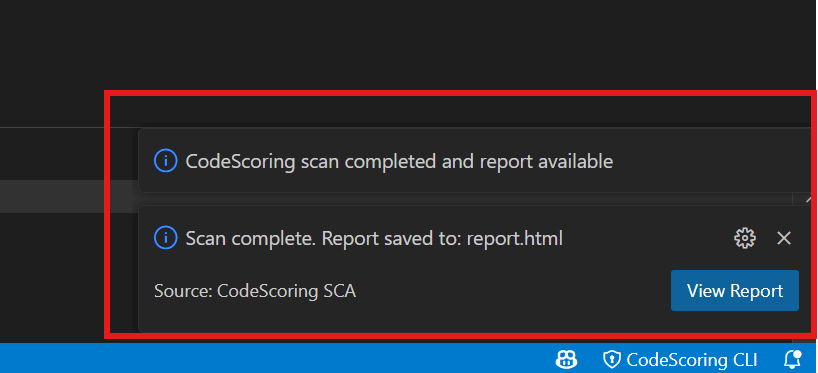
- Check notifications: Look at the notifications in the bottom-right corner of VS Code, click "View Report"
- Open the vulnerabilities tree (opens automatically by default): Use the "Open Vulnerabilities View" button from the sidebar panel
- Review vulnerabilities: The vulnerabilities panel will show all detected security issues in your dependencies
- Explore details: You can click on individual vulnerabilities to see detailed information
- Apply fixes: Use quick fix options to update vulnerable dependencies
7.1 Vulnerability Highlighting
- In-code highlighting: Vulnerable dependencies are highlighted as you type
- Severity colors:
- 🔴 Critical (red)
- 🟠 High (orange)
- 🟡 Medium (yellow)
- 🔵 Low (blue)
- Multi-file support: Works with all supported file types
- Hover over highlighted dependencies to see vulnerability details
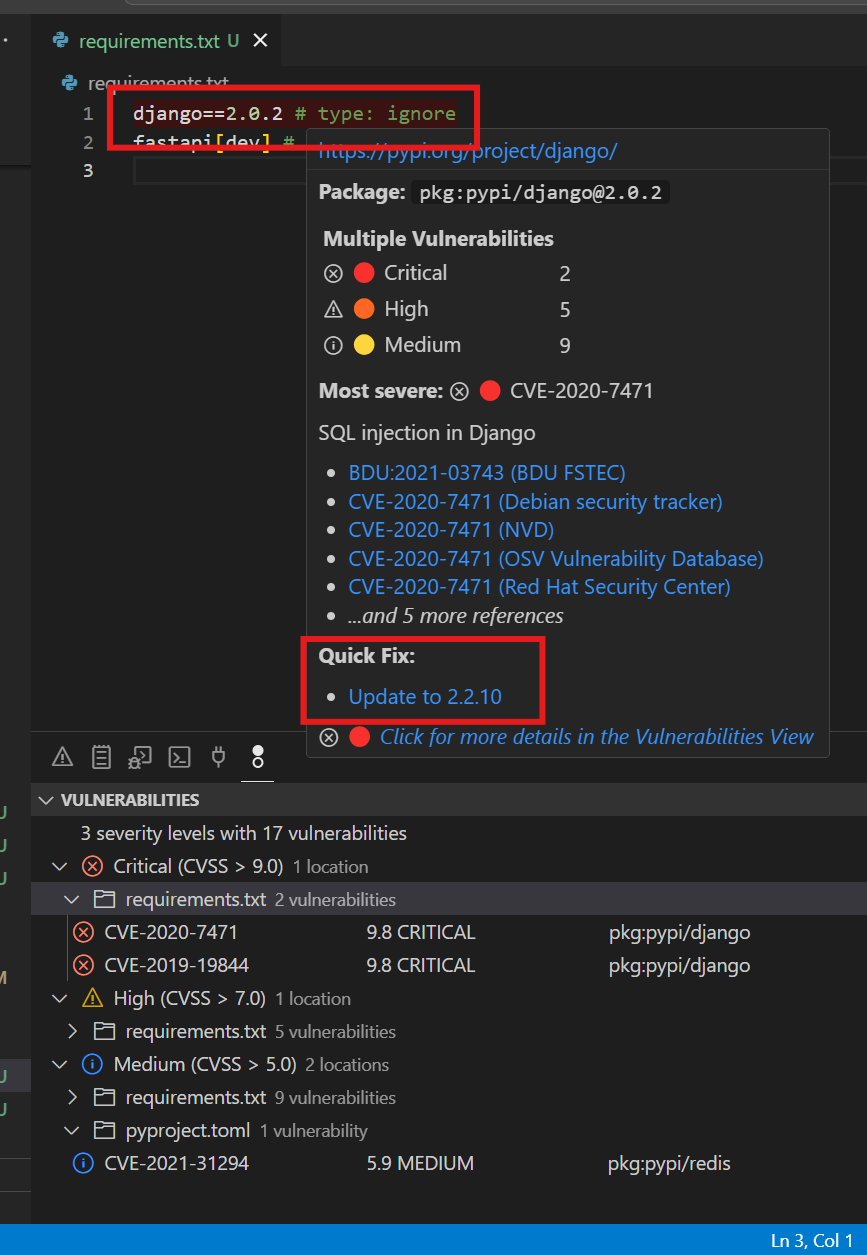
7.2 Hover Information
When hovering over highlighted dependencies, it displays:
- Vulnerability ID: CVE number with link
- Severity: CVSSv3 score and level
- Description: What the vulnerability does
- Source links: Official vulnerability registration information
- Quick fix: One-click update option
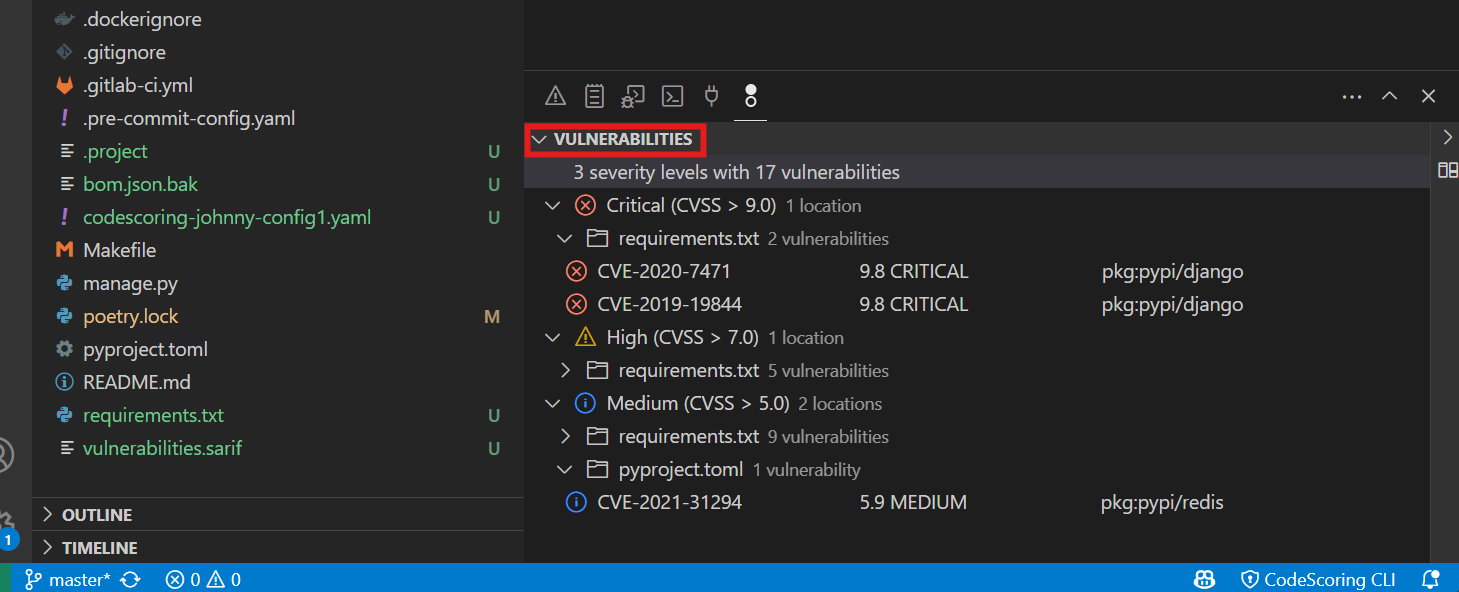
7.3 Vulnerabilities Panel
7.3.1 Tree View Structure
📊 Vulnerabilities (247)
├── 🔴 Critical (12)
│   ├── CVE-2023-1234 - Remote Code Execution
│   │   ├── lodash@4.17.20 → 4.17.21
│   │   └── package.json:15
│   └── ...
├── 🟠 High (45)
├── 🟡 Medium (89)
└── 🔵 Low (101)
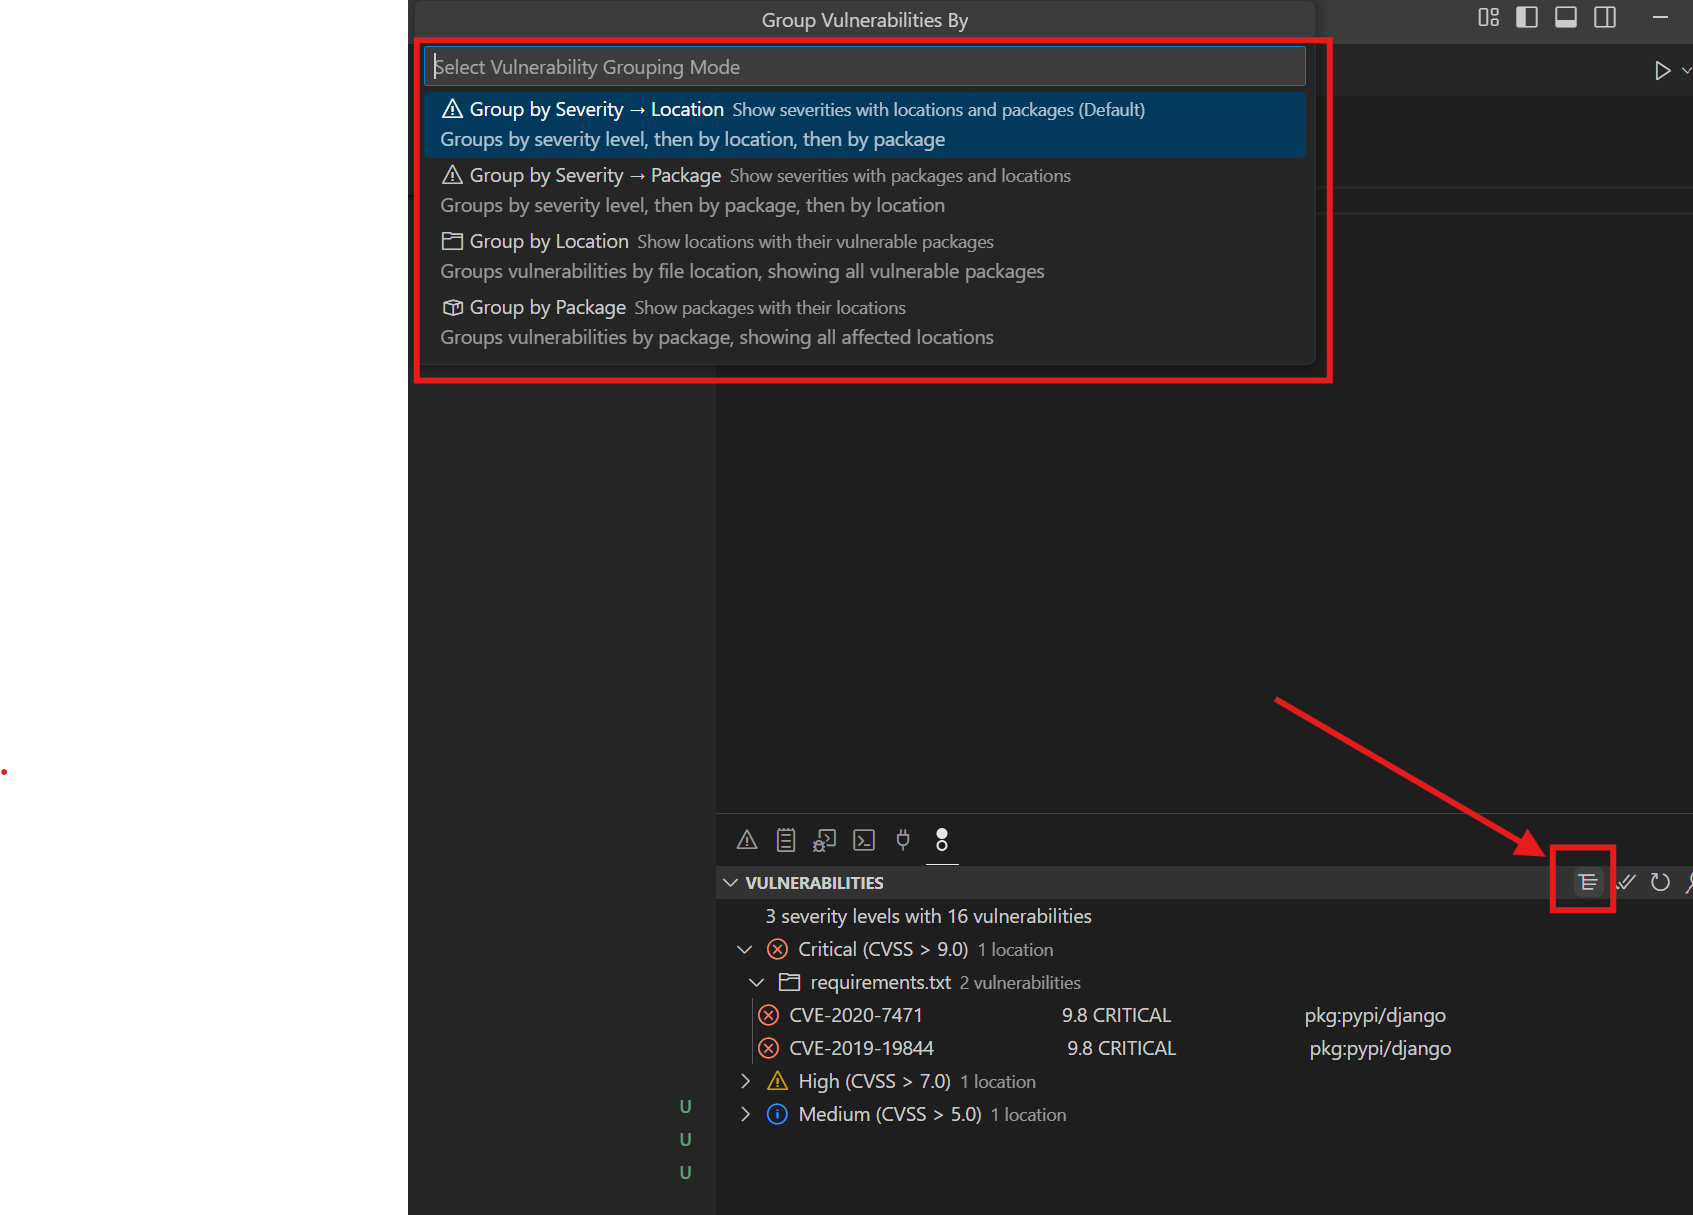
7.3.2 Grouping Options
- Use the vulnerabilities panel to filter by severity, package, or other criteria
- Group vulnerabilities by different categories for better organization
Change grouping via toolbar button or command:
- By Severity -> Location (default): By severity level, then by package
- By Severity -> Package (PURL): By severity level, then by package name alphabetically
- By Location: Group by file path
- By Package (PURL): Group by package
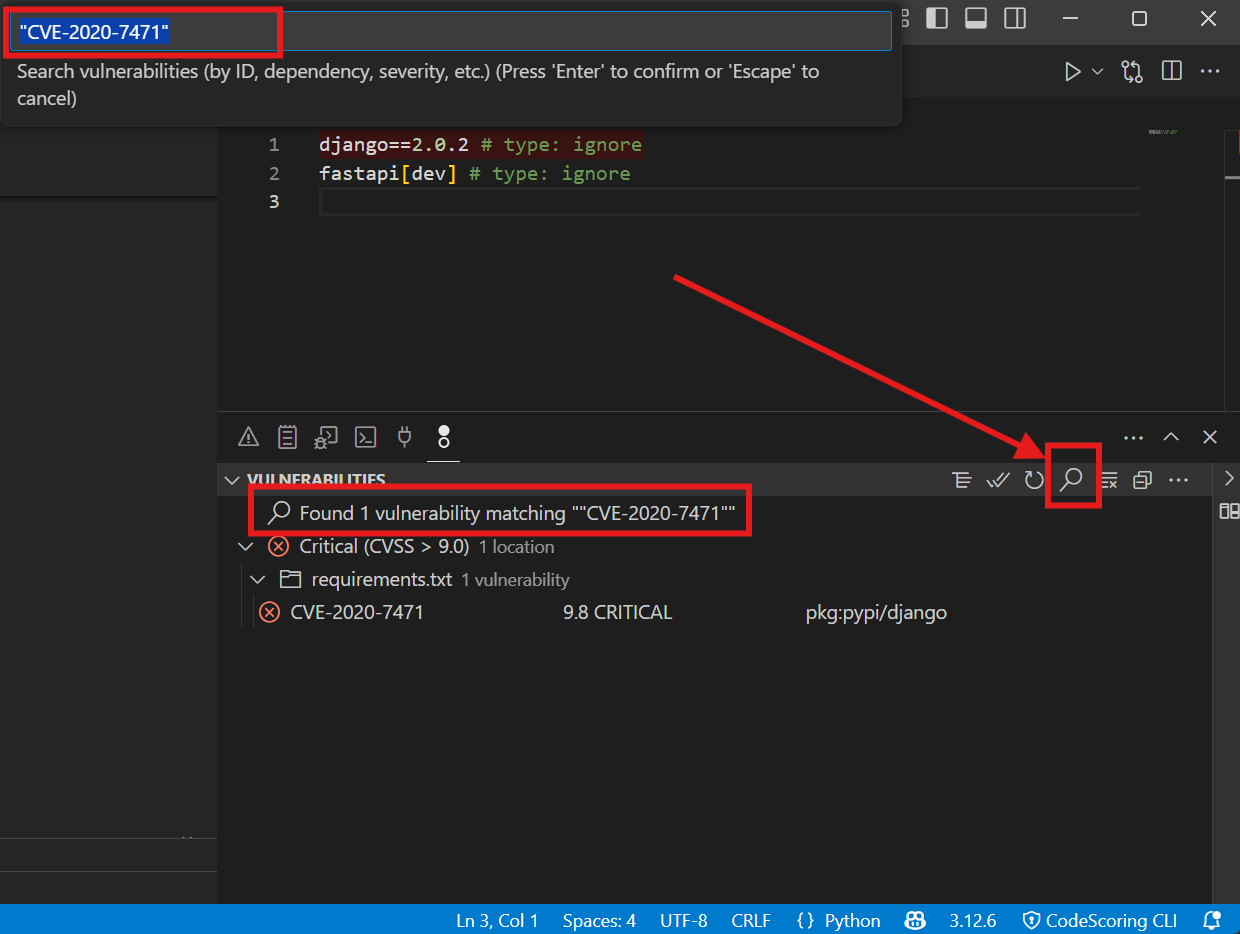
7.4 Search and Filtering
Search Capabilities
- Multiple fields: Search by:
- Package name (e.g., "lodash")
- CVE ID (e.g., "CVE-2023")
- File path (e.g., "frontend/")
- Severity level
- Fuzzy matching: Finds partial matches unless quotes are used
- Exact match: Use quotes
- Case insensitive: No exact case required
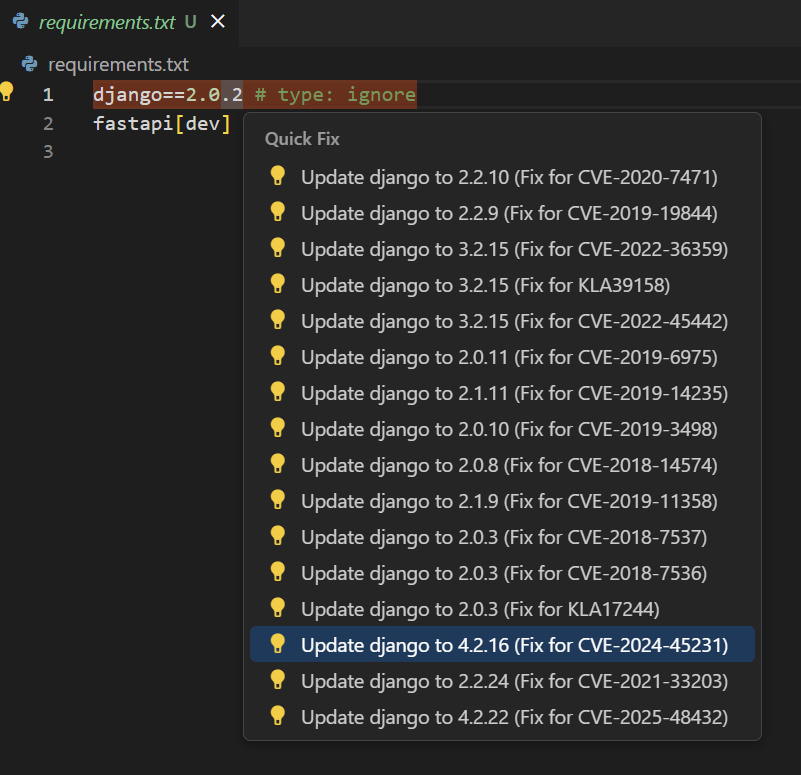
7.5 Quick Fixes
Quick Fixes
- Click on suggested version updates when hovering over a vulnerable component to automatically update to the latest dependency version
- When pressing
Ctrl+.(Cmd+.on Mac) while the cursor is on a vulnerable component, you'll be prompted to select a specific version to update to (if multiple are available)
Individual Fixes
- Hover your mouse over a vulnerable dependency
- Click on the suggested version in the tooltip
- After updating, you'll see a success message
or
- Hover your keyboard cursor over a vulnerable dependency
- Press
Ctrl+.(Cmd+.on Mac) - Select the appropriate version from the list if there are multiple
or
- Fix Selected Button: Select one vulnerable component or a vulnerability belonging to that component, and the component will be updated to the latest safe version
Bulk Fixes
- Fix All Button: Updates all vulnerable components with available fixes that are currently visible in the tree, taking into account applied filters (magnifying glass)
7.6 Working with BOM Files
Auto-loading
The extension automatically loads BOM files from:
.codescoring/bom.json(primary)bom.json(root directory)
Manual Operations
- Load BOM:
Ctrl+Shift+P(orCmd+Shift+Pon Mac) → "Load BOM File" - Close BOM: Clears all vulnerability data and frees memory
7.7 BOM Comparison
Automatic Comparison
When opening a project:
- Loads current BOM (
bom.json) - Compares with previous (
bom.json.0) - Shows notification of changes
Manual Comparison with Open BOM
- Have a loaded BOM (target)
- Execute "Compare BOMs" command
- Select base BOM file
- Comparison result will be displayed in DIFF panel
Manual Comparison of Two Arbitrary BOMs
- Close BOM if necessary
- Execute "Compare BOMs" command
- Select base BOM file for comparison
- Select target BOM file to compare with base
- Comparison result will be displayed in DIFF panel
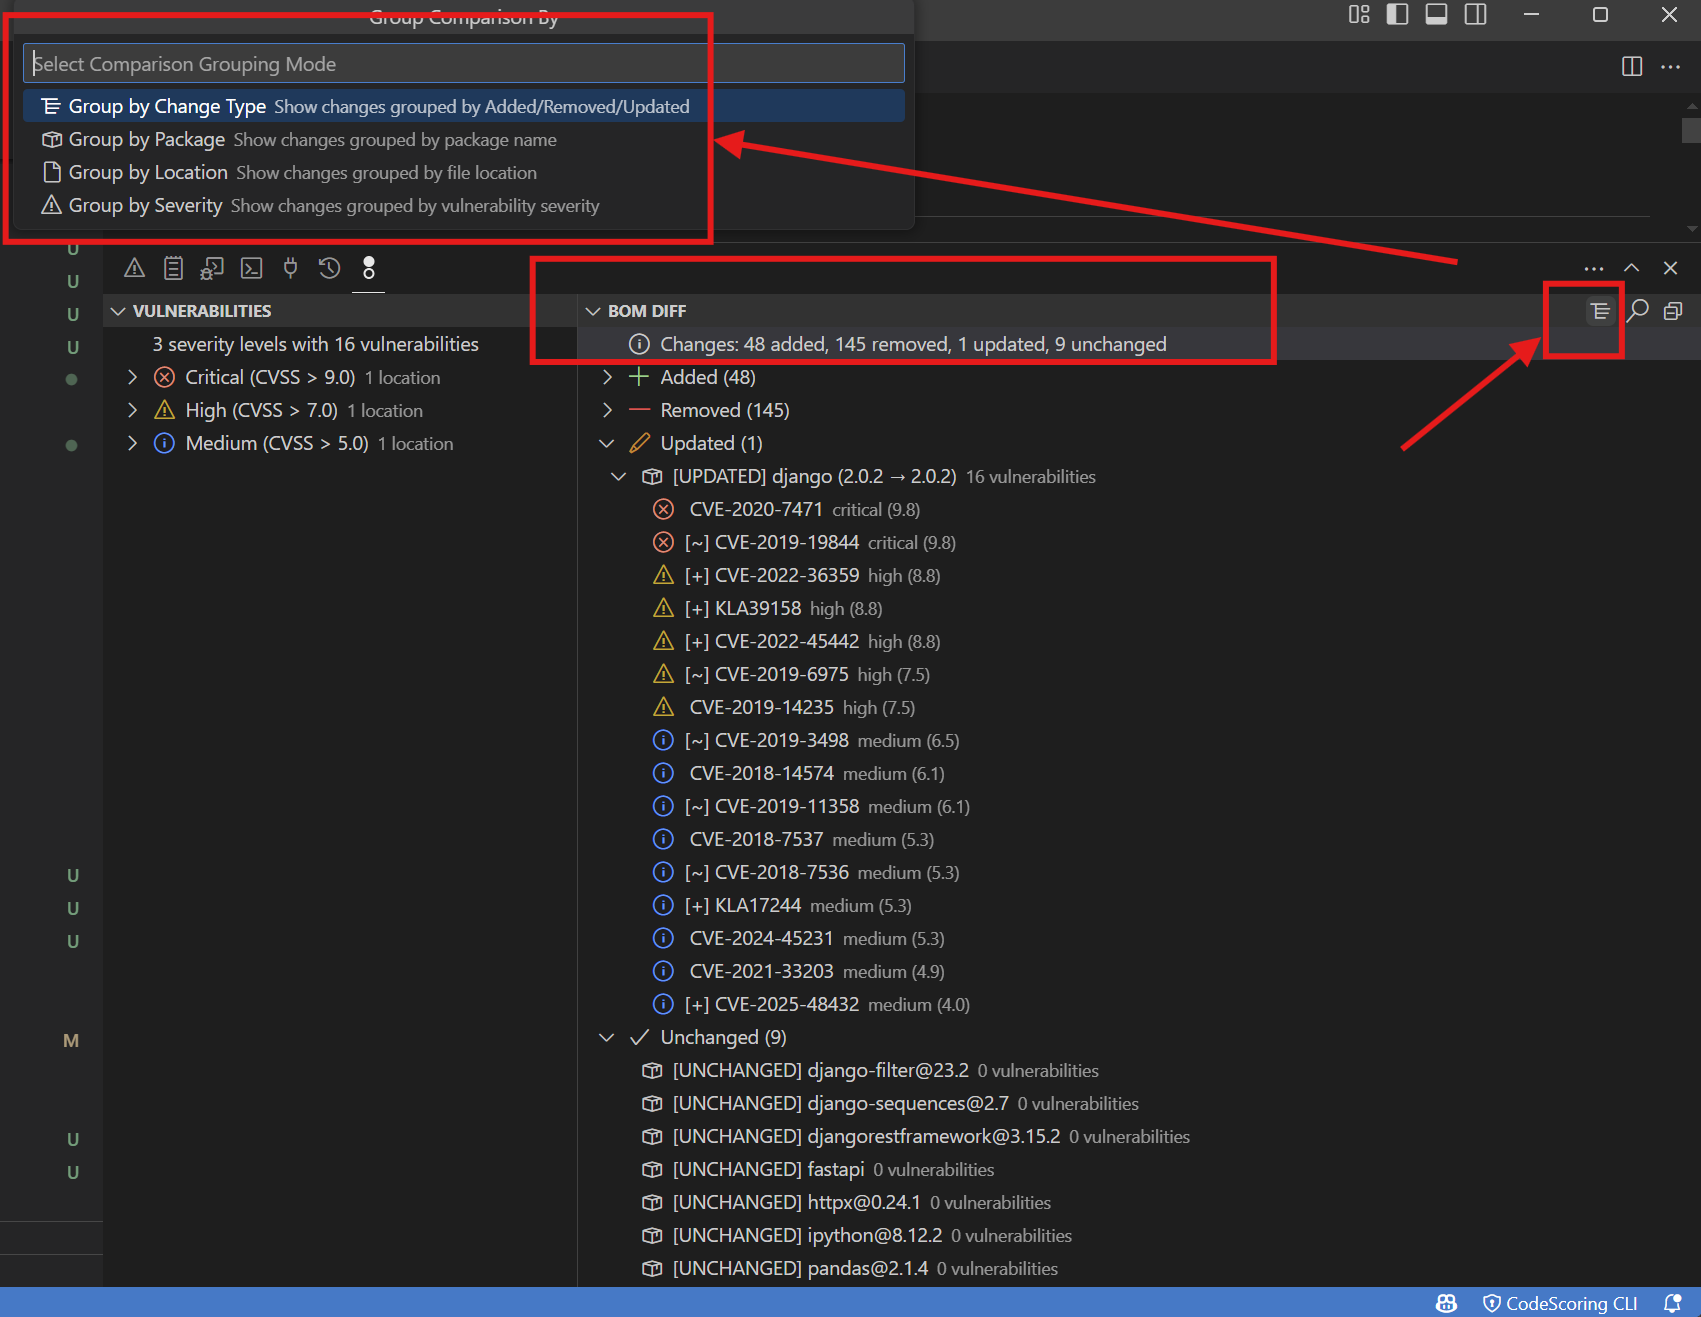
Comparison Views
📊 BOM DIFF (Changes: 23 added, 15 removed, 45 updated, 73 unchanged)
├── ➕ Added (23)
│   ├── [ADDED] react@18.1.3 0 vulnerabilities
│   └── ...
├── ➖ Removed (15)
├── 🔄 Updated (45)
│   ├── [UPDATED] lodash: 4.17.20
│   └── ...
└── ✓ Unchanged (73)
Comparison Grouping Options
- By Change Type: Added/Removed/Updated/Unchanged (note: updated means the vulnerability count was updated for a component)
- By Package: Alphabetical package grouping without version. This is the most useful grouping for viewing updated components (added version and removed version will be grouped together)
- By Location: Group by file path
- By Severity: Group by vulnerability impact
Comparison Filtering
You can also search/filter the BOM DIFF tree to focus on components of interest. To clear the search, click the "Clear Comparison Search" button in the top right of BOM DIFF.
7.8 Reports
Scan Reports
- Automatically generated: Created after each scan
- Location:
.codescoring/report.html - Format: Colored HTML
- Contents:
- Scan status
- Command executed
- Results summary
- Found vulnerabilities
- Policy warnings
- Error messages
Viewing Reports
- Command: "View Latest Scan Report"
- Opens in: HTML Preview in VS Code
- Adapts to the selected VSCode color scheme at generation time
7.9 Settings and Customization
Available Settings List
| Setting | Description | Default |
|---|---|---|
apiUrl |
Your CodeScoring installation URL | |
apiToken |
API token. Securely stored | (set via command) |
installationType |
local or docker | local |
johnnyCliPath |
Path to Johnny CLI (empty for auto-download) | (auto-download) |
dockerImage |
Docker image name with Johnny CLI | johnny-depp:2025.29.0 |
dockerRegistry |
Registry with Johnny CLI image | (provided by support) |
dockerOptions |
Additional docker options | |
enableHighlighting |
Show in-code highlighting | true |
enableHover |
Show hover tooltips | true |
enableQuickFixes |
Allow one-click fixes | true |
showVulnerabilityHeaders |
Display headers for vulnerability columns | false |
paginationSize |
Number of items per page | 100 |
batchProcessingSize |
Number of items to process at once | 100 |
severityColors |
Custom color mapping | (default colors) |
Keyboard Shortcuts
Configure in VS Code settings, for example:
Troubleshooting
Extension Logs
- For detailed understanding of plugin functionality, check the extension log file located at:
- Windows:
%USERPROFILE%\.vscode\extensions\codescoring-sca-[version]\out\logs\extension.log - macOS/Linux:
~/.vscode/extensions/codescoring-sca-[version]/out/logs/extension.log
- Windows:
Common Issues
Scanning Issues
| Issue | Solution |
|---|---|
| Scan hangs | Try running the cli file manually, ensure the operating system and antivirus allow it to work, check internet connection, verify API token |
| No results | Ensure project has dependency files, check report.html output |
| Partial results | Check ignore patterns in configuration |
Display Issues
| Issue | Solution |
|---|---|
| No highlighting | Enable in settings, reload window |
| Wrong colors | Check theme compatibility |
| Missing panel | View → Open View → Vulnerabilities |
| Hovers not showing | Enable hover in settings |
Fix Issues
| Issue | Solution |
|---|---|
| Fix fails | Check write permissions |
| Wrong version | Manually specify in package file |
| Breaks project | Use version control, rollback |
| Conflicts | Fix one by one |
Contact support: support@codescoring.ru
Security and Privacy, Data Handling
- Local scanning: Code is not sent to servers
- API communication: Only metadata is transmitted (your package manager configuration files)
- Token storage: VS Code credential secure storage
Best Practices, Workflow Recommendations
- Initial setup: Full scan when starting a project
- Reviews: Compare BOMs between versions
- CI/CD:
- Before commit: Run full scan
- Share configuration: Commit
.codescoring/config.yaml - Ignore reports: Add
report.htmlto.gitignore - Track BOM changes: Version control
bom.jsonfor history - Standardize: Create team-wide VS Code settings